Current progress charts and pictures.
MAIN PROGRESS CHART
These charts will show details of the dates and work being carried out, and an overall picture, of my battle to renovate the car. These details are recorded as accurately as my banana fingers will let me.
I am hoping that,even on my bad days I shall still be able to keep an accurate record of the build-so future owners of this car will have the benefit of something I never had-what,has gone on before.
I was offered, and accepted the car on 09-02-2010 ,it's 49 th anniversary of the car being first registered on 09-02-1961 .
My first task, after collection was to list of all the items that were present, or spares that came with the car. When this list was complete, it obviously gave me another list ,which were items that were missing from a completely standard vehicle.
Car collected by trailer- 09-03-2010.
Official "project"start date, 19-04-2010 was missed due to me not being well, the new date,as of 12-12-2011 is 02-06-2012.
The number of days owned=1
The number of days worked on it=1
The number of hours worked on it=1
A running costs total (not including Labour)=£101.00-collection of car.
Approximate savings made=see below *
And the PEED-OFF.=847 days number of days to the (Project Estimated End Date-Obviously Far Fetched )originally 19-04-2011.
So, as of 15-05-2010, which is now the new project start date.
The number of days owned=68
The number of days worked on it=1 (ill health)
The number of hours worked on it=4 (ill health)
A running costs total (not including Labour)=£101.00+ £80=£181.00
One replacement Radiator,Front windscreen,replacement Diff, from scrap rear axle-rusted through ends, well driven prior to removal and dismantled=all in a job lot,lots of small bits= £80
Approximate/estimated savings made=£2461*
And the PEED-OFF.=751
"Project Estimated End Date-Obviously Far Fetched "
* Estimated by adding up the average costs of every item that was present when I took the car on as a project. Costs shown at today's prices ,15-02-2010.
All of these items would have had to purchased by me,if these donations had not been made ( I would have had to make this purchase by last April, if I was to keep within my retirement timetable)
Project Specs as at-23-05-2010,
The number of days owned=77
The number of days worked on it=4 (ill health)
The number of hours worked on it=18
Running costs (not including Labour)=£181-00 + £45.00 = £226.00
Replacement Speedo and cable, secondhand battery for test fire up, two spare "rebuild" rims and old "run around the garage" tyres.Pair of used front wings, total = £45.00
Savings made *
And the PEED-OFF.=743
(Project Estimated End Date-Obviously Far Fetched)
Project specs to date – 24-05-10
Number of days owned=78 (Doesn’t time fly?)
Actual days worked on it (expressly due to more ill health) 6.
Total hours completed to date =22
Additional spares arrived today 24 05-10, Full set of electrics-plugs, points, condenser,silicone plug leads,rotor arm, dizzy cap straight end.£40.00+ £226.00 +Total running costs=£266.00
Savings made *
Days to PEED date =744
Next Task in hand=Test run the engine, gearbox, prop shaft and back axle complete (although another 4.222:1 Diff assembly has already been acquired, and ready to change due to the present Diff being only a 4.55:1) Engine ran OK,gearbox,Diff etc. but only two prop-shaft bolts holding things together so I was lucky there,thus allowing limited testing. Engine tested for compression all cylinders at around an even 120 lbs p sq",which is very low but was not 100% sure of the testers seal at the plug end.I shall see what can be done later.
Project specs to date - 12-10-10
Owned=216
Worked=6+6 = 12
Hours= 22+3+3+3+2+2+4+4+4+ =47
Running costs=As above
Savings made *
PEED-OFF=601
Specifics as follows
12 Oct 3 hours x 2 clear for boards and pole collection
13 Oct 3 hours Board cutting and drilling
14 Oct 2 hours Board fitting
15 Oct 2 hours pole fitting
17 Oct 4 hours x 2 (long day) Rotissorie set up initial fit
20 Oct 4 hours Construction time and testing
22 hours total -best work period to date..Sadly most of November has been a write off due to my personal health issues.
Andrew has been so busy at work that I have had to insist he does not call over after he finishes work, but to go home for his evening meal-there will be plenty of time when I am more up for the jobs and he's not so pushed for time.
December is proving too difficult too at the moment but remaining upbeat.
Sadly December was also a write-off and looking towards January to get started again.(fingers crossed)
Still undergoing a course of intensive physio and supervision at the Spinal Unit in Leeds Teaching Hospital,as referred to by York District Hospital so cannot rush anything- doing as I am told, which does not sit too well.
Well here we are early Sept 2011- Eleven months later=what a waste of time that seemed to be, a real "nothing " year. After all that's been done too.But Hey-Ho, onwards and upwards.
I saw the specialist a week last Wednesday, who has informed me that, it is now expected that things will not get much better -but just to continue with the Physio and I'll see you again for another assessment-so I am back in the "Play-Pen" being cautious .
So from being positive and working towards being told there's a good chance of serious improvement. Down to this.I cannot hang about all day.I've got the rest of my life to get on with.
I was full of hope-and of being discharged. But to be told this-is a dissapointment.
So it's a case of just get on with it and see.
Project Specs as of -03-09-2011.
Although I have not been active in the Garage, for quite some time, I've been active in acquiring parts (much to the amusements of the mmoforum) .
Here is a complete list of my "down-time" acquisitions and acknowledgements.
Total running costs (not including Labour)=£181-00 +£ 150 welder (eBay)+ £150 body panels (Tony Garnham -Parkes)+ £30 Tools+Anti-Flash welding helmet £20,and a free set of rear lights-thanks to Big Al (Alan Graham)-Wiper motor free from Mogmad56 (Andy Foster)and the promise of a rear bumper too.
Replacement rear axle complete, generously donated to the cause FOC, thanks to dth (Dan Harris) -four good quality standard wheel rims-thanks to Little Blue Pickup ( Simon Gray) , Speedo cable, compression tester , two spare rebuild rims from Repres (Richard Milverton) "renovation tyres only" for using around the Garage.
A job lot on (eBay) for £45.00. Scrap bonnet, good quality spare HS2 carb,spare working fuel pump,Radiator-loks very much worse for waer.- other miscellaneous bits also including two nearly new ,and good chrome hockey sticks , A Minor Bonnet requiring welding work from, ndevans (Neil Evans) this was passed on for use on my friends convertible (end of his rebuild), so it went to a good home.
I obtained a free Bonnet for Phoenix from Plin (Pauline Brown and her Husband) it's finished nearly in the right colour and is in excellent condition.
I have had welding and metalworking tuition Woodywoodchipper (Alan Lowe) and lovely refreshments provided by "Mrs Woody"- the lovely Diane.
I acquired a set of 8 " front hubs complete with Stub axles from Mark (cmea) , a cuppa and great slice of cake (all cheap at half the price LOL)
I was offered some very early "Rocaro" labled seats, a good set of both front and rears by "Huzey",these had been previously fitted to a Minor. With the right type of bases, with adjustment and refurbishment of the covers, they will enhance my access and comfort, both into and out of the car-he also gave me a set of gearbox screws-these were also FOC.
I won a mmoforum picture competition and won an oil filter from Mrben (Ben from Cheshire)- I obtained a new Master brake cylinder cover,assorted nuts bolts and two pairs of new rear shackle links. Also a gold faced Speedo from 500cc.( ebay =£11)
The number of days owned=541
The number of days worked on it=12+9+ 6 +15= 42
The number of hours worked on it=47 +19 +12+12 =90
Total costings to date £692 - not counting labour costs-LOL .
Saved costings=£3603.75 * see below
PEED-OFF=275
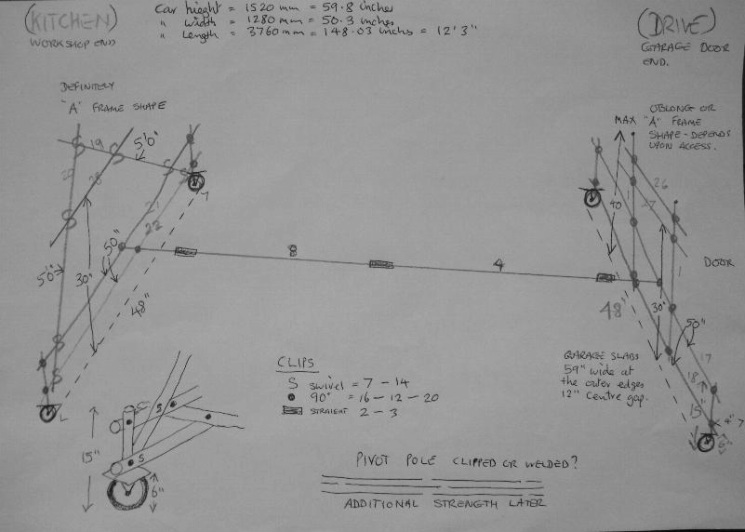
This is the design on paper showing the "Mark 3" Rotisserie plan.
"Mark 1" was built in the garden as a tester assembly and see if I had enough materials to do it. As this was during my "down-time" I was ably helped by "Boy Blunder" .
"Mark 2" was actually built in the Garage by "Boy Blunder".This structure was only just recently dismantled to finish stripping the body inside the Garage. The "Mark 3" version proved too weak to allow lifting of the body without stripping many items off of the body.It also had the under-body pole on the cars centreline which fouled the Diff housing when rotating the body.
The Mark 4 had the off-set under body pole, but this design was also flawed.
My Garage and work area dimensions ( don't laugh I couldn't build it any bigger-)and I know what size some of your own posh Garages are.
Sorry I've not been converted yet,I'm still Imperial
Width=7'8"
Length-18'0"
Full height-8'6"
Large ceiling half shelf, just above the up and over door (good storage area)=6'8"
So if you compare these, with all the measurements listed below on my Rotisserie plan you'll see why I have done -what I have done.
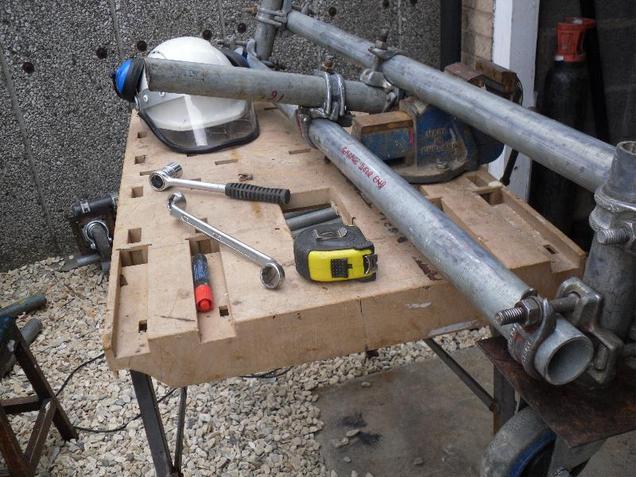
This picture shows one end of this "Mark 3" version, this one is the Garage "up and over" door end, which has a small height restriction.
I have attached a small under body connecting pole, as you'll see, so as to get the correct " under the car angle" as it extends over to the other base support A poles. (this design later proved to need an additional-under body connector pole)
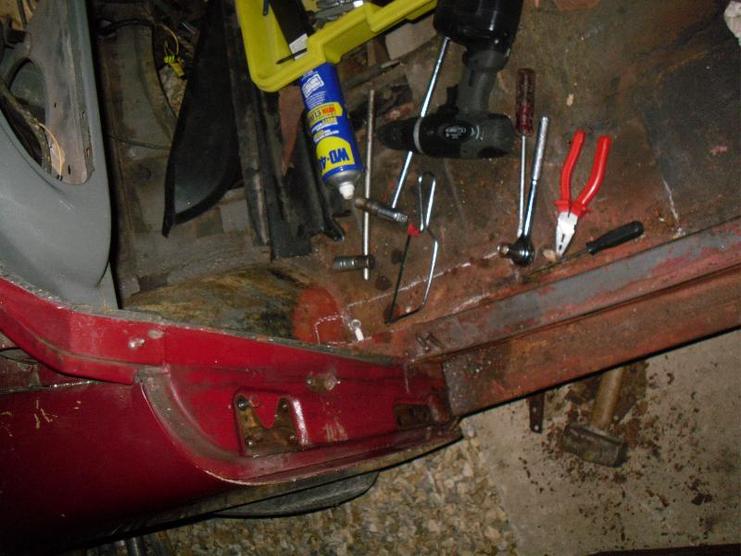
As with any Classic Car renovation-the old adage is true-if you are removing 3 bolts, one is sure to give you trouble
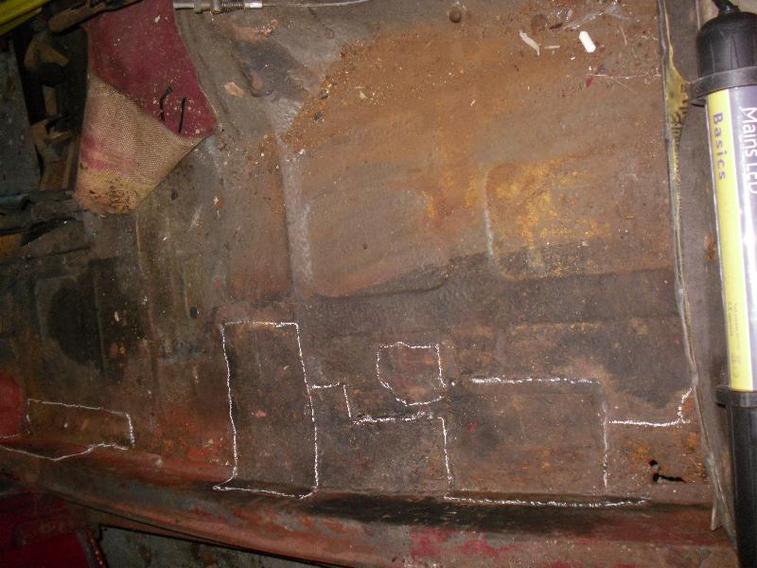
Some of the "patches upon patches" in the metal floor panels-as I have already purchased and intend to replace all four sections , both front and back ,this is only a picture for the records.
Not all that bad really for a 50 year old girl-there are many -some even younger who are a lot worse off.
First doors were off within a day and the prototype Rotisserie dismantled, ready to build up as the "Mark3" contruction ,and hopefully one which will do the job in hand.
I started at the drivers door and worked my way around, to the front passenger door.
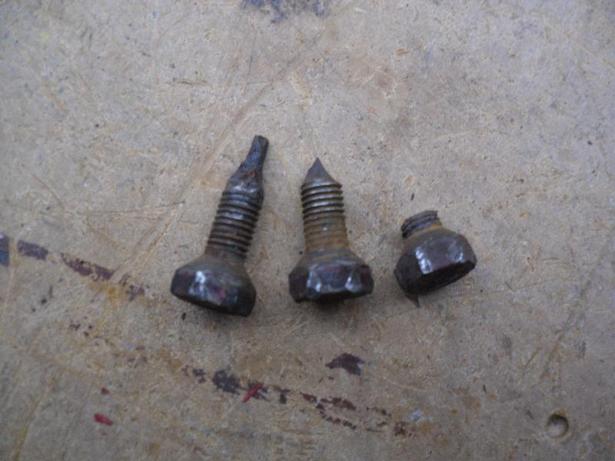
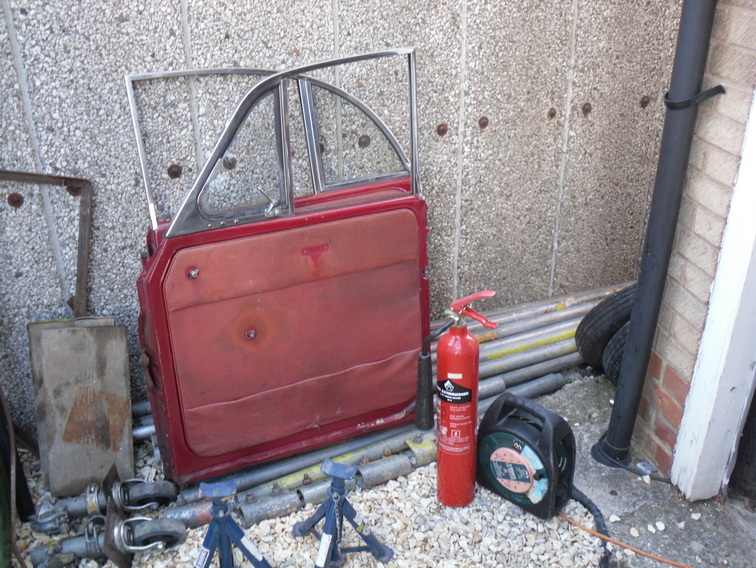
Drivers door -one broken bolt, I ended up using the grinder.N/S rear door -screws butchered but managed to make good headway. O/S rear door- a real pleasure to take off.
The picture below was the O/S passenger "$*&({}%@~" door. Which Involved 2 broken bolts and screws all messed up too much previously, so couldn't use my impact driver . All of this was, despite using a decent blow torch,breaker bar,drills, my big 50 thou adjustment tool and I managed to use a few choice "mechanical words" that led my neighbours to think I am quite a proficient expert in "classic car maintenance"
I suppose I am lucky, you hear of plenty of horror stories of bolts being removed from 50+ year old cars that are like major heart surgery.
As they say a picture is worth a thousand words-now that all 4 doors are off its another step in the right direction.
Next job, both front wings off-so that'll be a Doddle then ?
See below my first picture of both front wings off. this simple task eventually had me calling in the assistance of a good friend of mine -also from the MMO.co.uk forum " Alan="Woodywoodchipper" he paid us a visit,and assisted us in our hour of need. He not only got both wings off,he also removed both front bolts on the rear springs.
He kept on saying "Ok job done,what's next" I was glad when he eventually went home,(my head was spinning) I was well satisfied, he had done some great work on "Phoenix"-and made me (not) a little embarrassed- with his prodigious work rate.
It was during this visit that Alan inspected the car for me, in a most thorough and professional manner. I discovered that the car was far better than he had initially thought.
The car still had most of the original floor and parts of the sills -although patched quite a lot. The B and C posts were original, as was the off side A post.
The car had survived the past 51 years remarkably well,and was certainly worth all the time,effort and money to resurrect.
Credit must also be given to "Orkney" specifically and "Dave S" the last owner. They were the ones that had generally assessed the car as being worthy of passing on to someone keen enough to take it on and not scrapping .
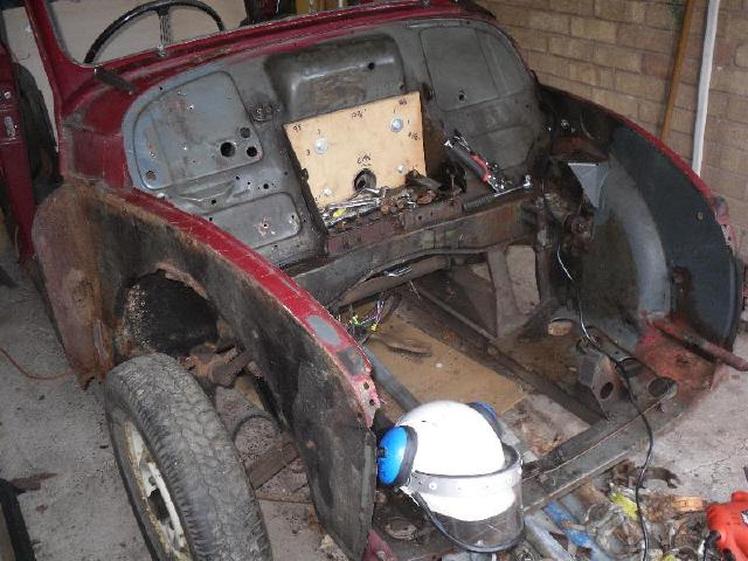
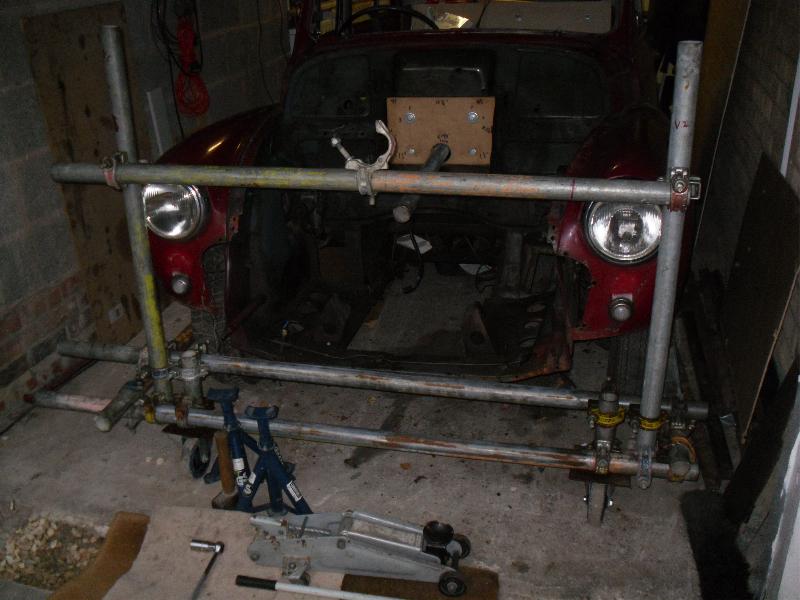
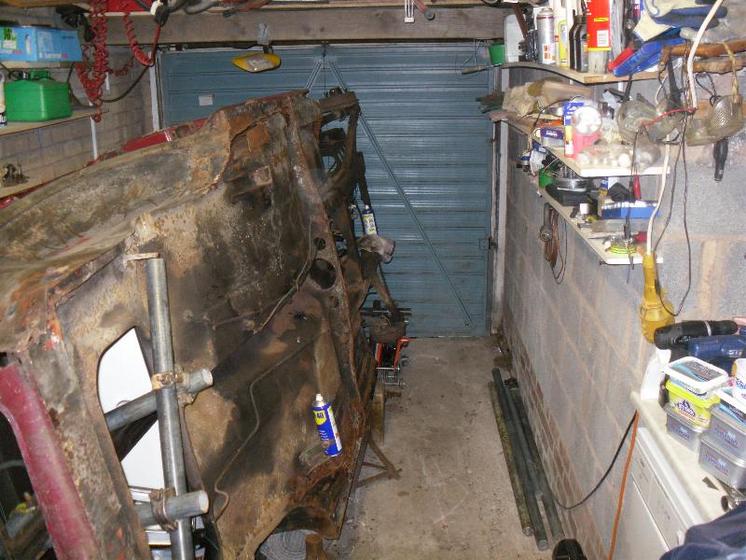
Here "she" is looking decidedly grubby,rusty and ill kempt.
Now to see about measurements and testing the rotisserie.
I looked into the possibility of using a larger diameter-thicker walled- pivot pole. This will be instead of the present scaffold pole system, which has a lot of lateral flexion. I have thought about having the capability of adding some running gear to the body-when on it's side after I finish the metalwork for easier access . A larger diameter tube would allow this. But for now I shall test my original theory, as I have now lost all the weight of the axle complete and all road wheels,all four doors, bonnet and the wings. I'll just crack on with getting "Phoenix airborne".
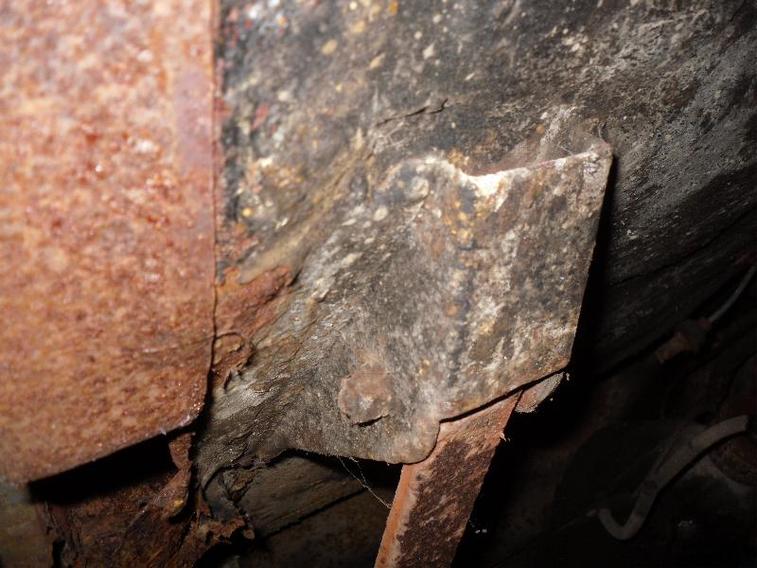
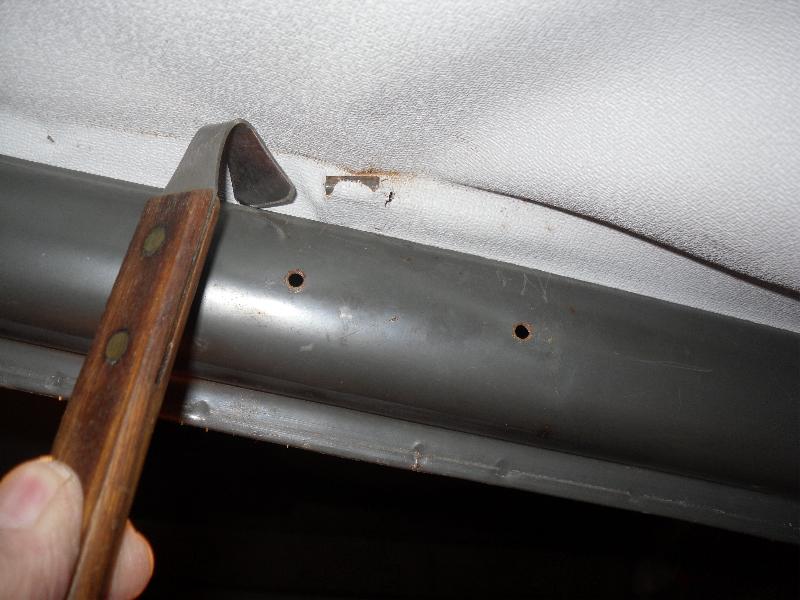
This is the N/S floor area of the cab showing the patches done by previous owners. It is interesting to see long plates over the area where the main cross-member is underneath the floor.
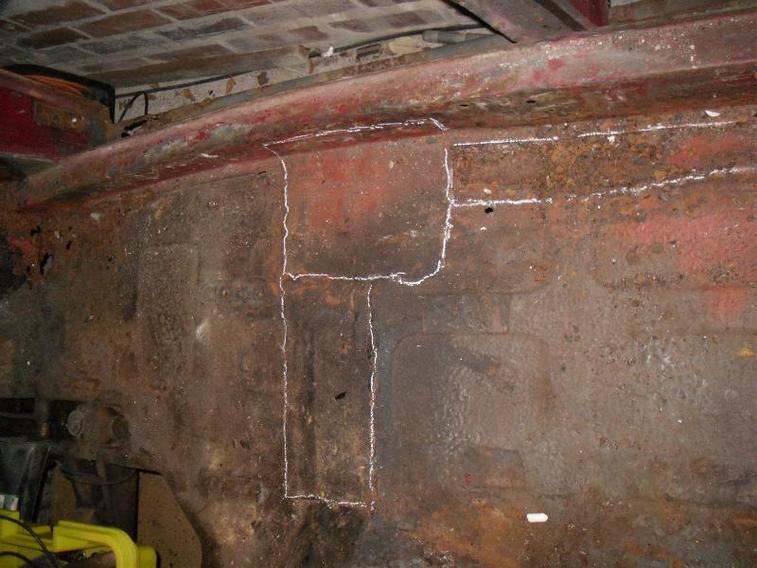
Accurate measurements were than taken of specific reference points-starting with the door gaps.
This was done because the complete sill structure,as well as the floors ,will be totally replaced.
The reference points as shown below, are A to B and B to C Posts to where they meet the top of the Inner step.
Off-side- A post to B post is 28 and a half inches=72.5 cm (all the metalwork looks to be original, unlike the other side) so that means that the Near-side A to B post is three sixteenths of an inch different.
As there were problems adjusting both doors before strip-down I am going to assume that these measurements are good to go.
Off-side B post to C post 16 and three quarter inches=42.5 cm.
Near side B post to C post rear -16 and three quarter inches=42.5 cm

near side front inner, 28 and five sixteenth inches=72 cm

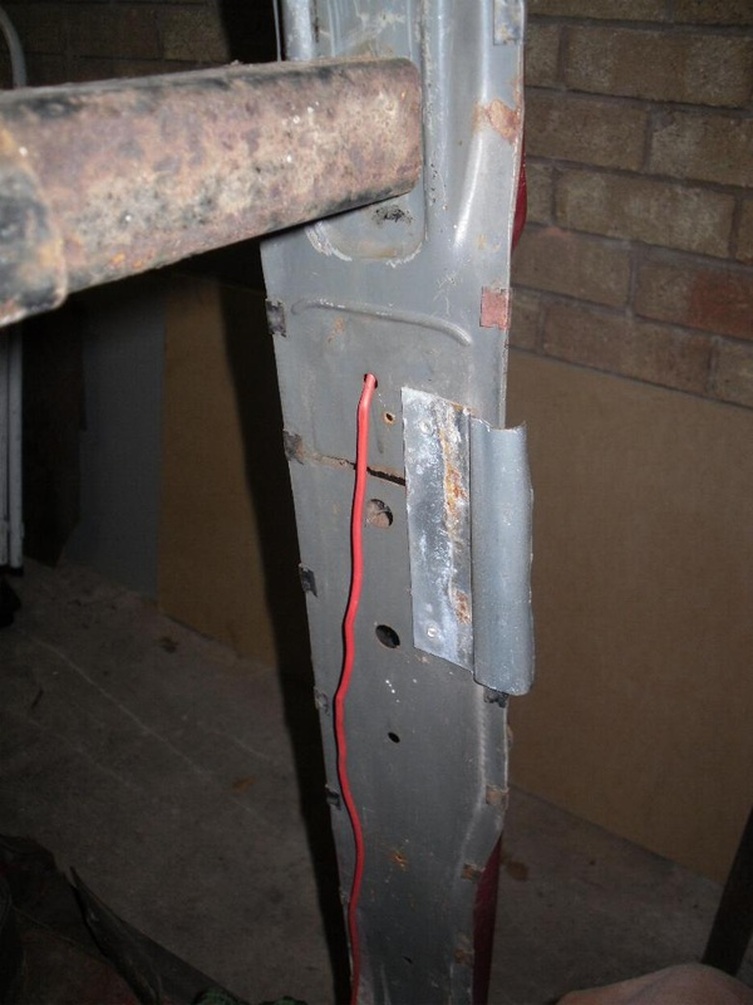
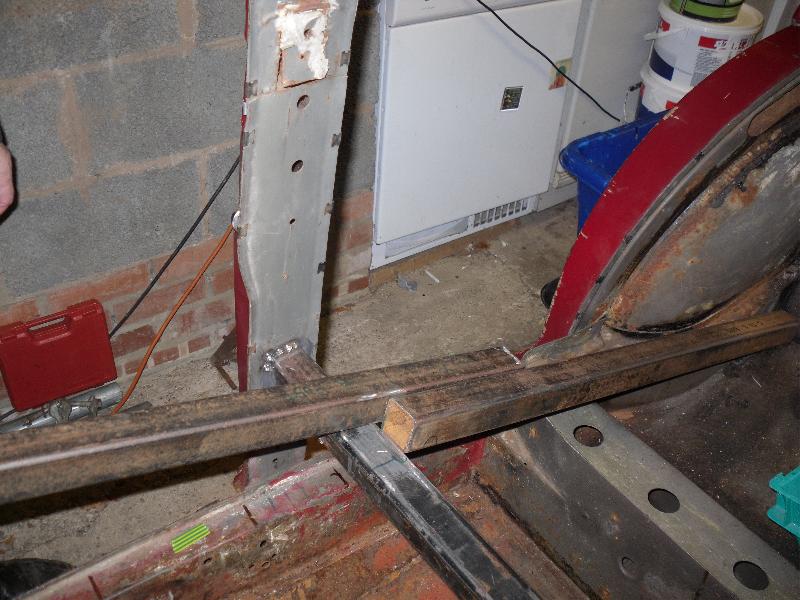
This shows a test fit of a cross-cab bracing bar that will be used to brace both the "B" posts together in line. This bar will also support others which brace both the "A" to "B" and "B" to "C" post gaps, I was informed that this bar is shown in the wrong place-it will be lower when welded into place.
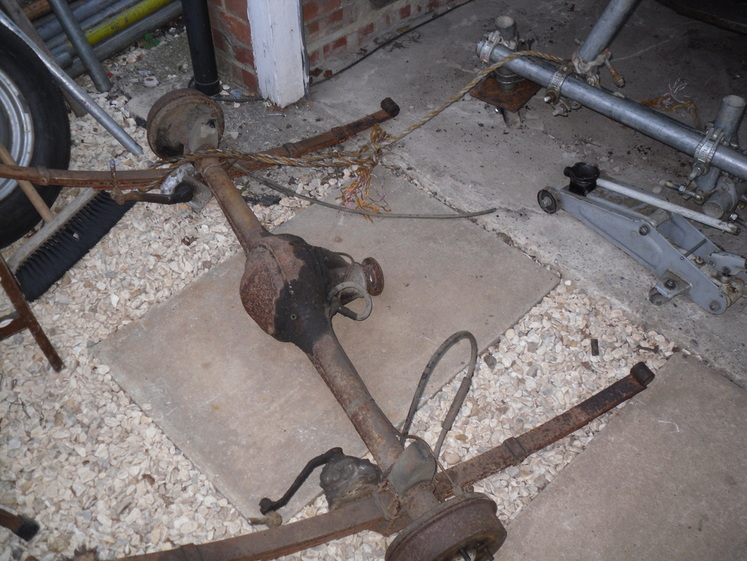
Here's the present rear axle/diff (4:55.1) it's the original item which was paired with the 948cc engine installed when it was first assembled.
I have acquired a later (4:22.1) which will be installed as the renovation progresses along with a 1098cc engine. (update on 18-08-2012-I obtained another complete rear Axle last week,with a 3:9 Diff in it, the whole axle ready to go,was £150,a bargain for this sought after item.)
The other Diff,which was gifted to me as part of the project now gets passed free,onto Chesney,another enthusiast from Leeds.
I am in the process of disconnecting or just cutting the items that are being replaced anyway,all for ready for removal.
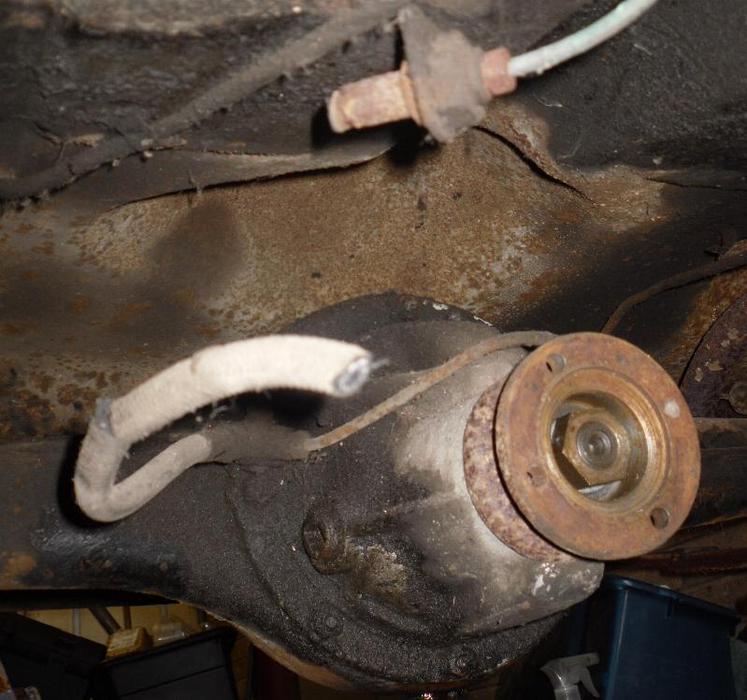
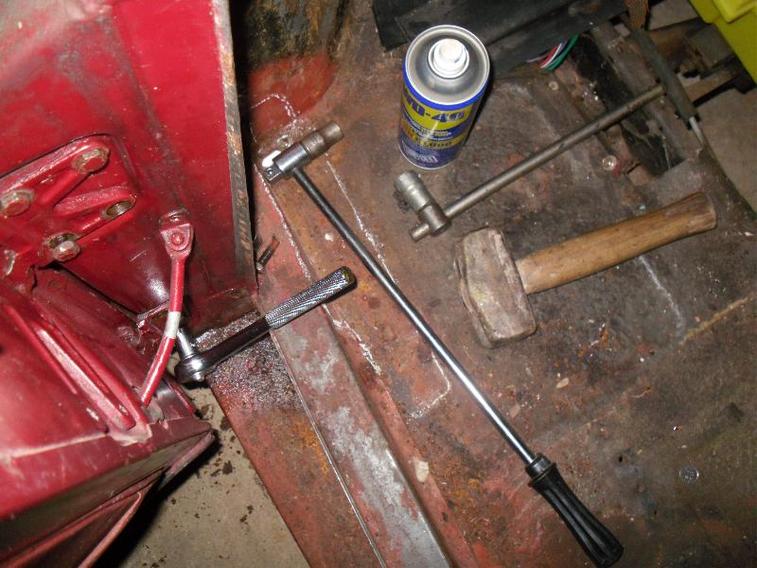
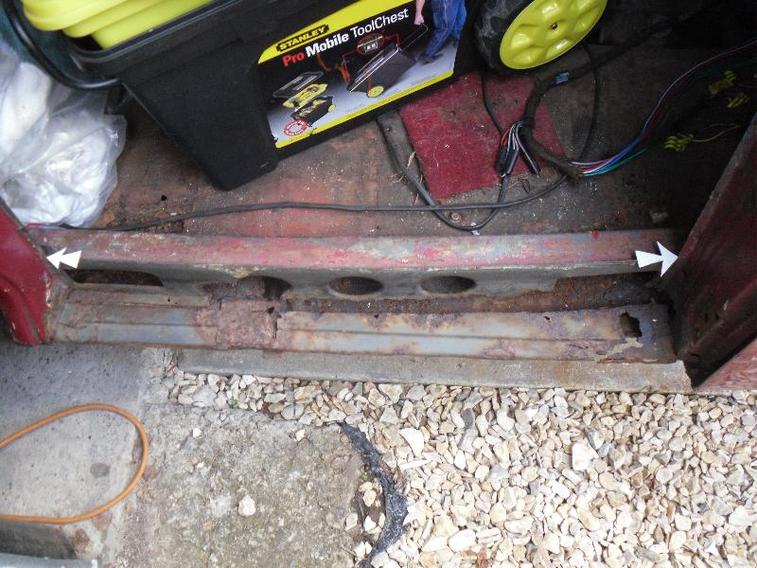
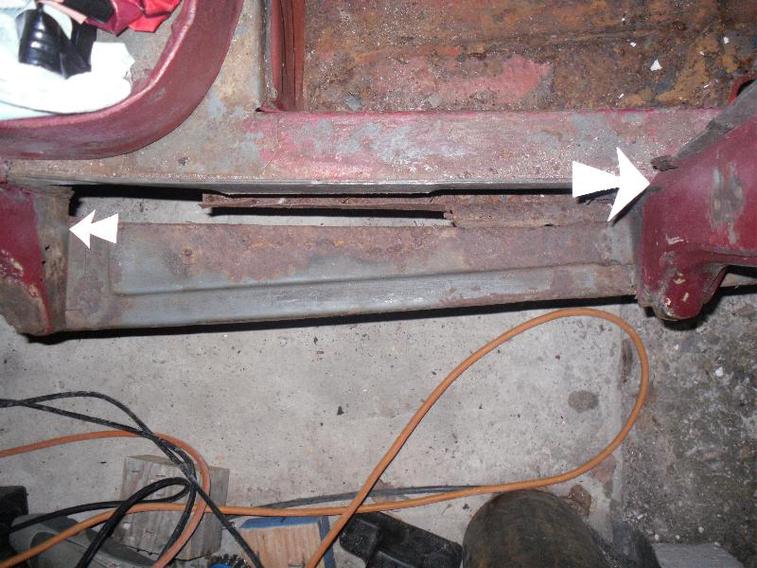
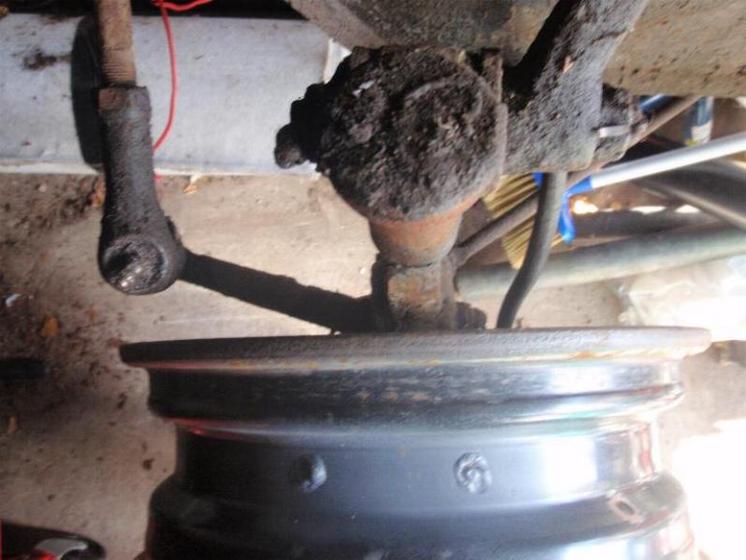
Looking at this diff oil seal, it looks like it was replaced some time ago judging by the old oil thrown about, but none in the recent pattern area.There is major corrosion around the rear spring hanger connections-here are some cracks.
When this picture was taken , everything was disconnected on the Axle except for these front bolts.This job and finishing the unbolting of the two front wings, as mentioned above-was completed by my friend "Woody".
A picture showing the front base unit ,Mark 2 version,testing the basic feasibility,shortly after its dismantling in the Garden.
As you can see the units wheels are just within the cars wheelbase, so stability should not be a problem.
It is shown as a "box type" set up, with lower base unit connector poles on the outsides of the car.
This set up was changed ,when Cab body measurements were taken,and changed to an"A" pole design with an
under-body connector pole.
Shortly after this the Mark 3 version was also amended by changing the line and height of the under-car pole,this is because it fouled on the centre part of the differential cage,when rotating. Although my initial design was changed ,this under- car pole was still double clipped for adding strength to both vertical and lateral lines.
I decided to use an A frame arrangement on the front of the rig for conformity, and it should provide the estimated vertical lift height of 40 " ,to allow rotation. This height can be change later if needs be,as per my original design- above.
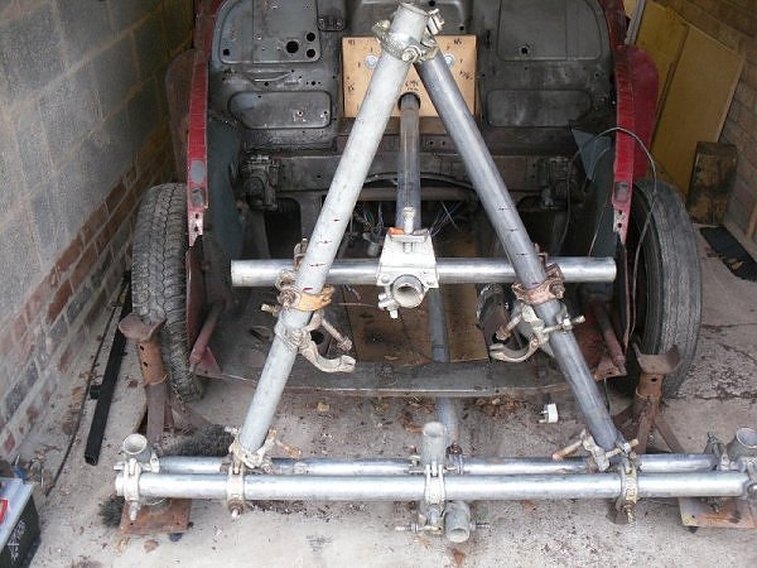
Mark 4 version, likewise the rear unit-the actual full dimensions will be published later.
I have attached two "stopper" end s to the Pivot Pole to help during the lifting phase.
Rear picture 1
Here is the rear unit raised close to the estimated "rear" rotation limit-approx just over 35 ". (38 "and three quarter inches-actual) - ( The front is approx 39 and three quarter inches-actual)
There are double clips on all but the wheel poles, which are single clipped (they cannot go any lower than they are at present). And the bases of the A poles (they have triple clips ) they share the constant loading with the cross brace pole.
This shows the transition from "full loading with additional test weight shown still in the boot area" and now eased off, for adjustment.
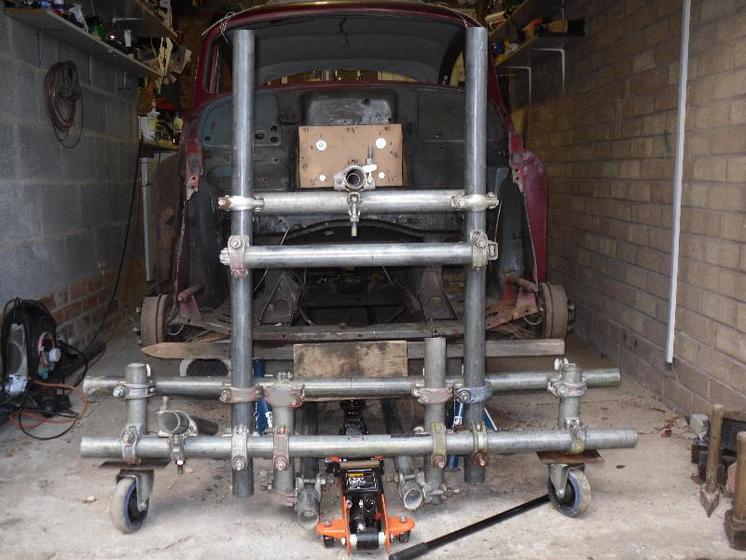
Here is the Chassis Cab fully suspended and free to rotate. The next task was to free the rear axle and remove from the Garage.
The photograph seems to make the width of the garage too narrow to allow the car to rotate within its own width. However there is an estimated three feet of clearance, which will be enough space for me,my belly and a few metalworking tools.

The full Axle,now detached , could not be dismantled when in situ, due to its condition, so was removed as is from underneath the car and out of the garage.
This shot shows the single "underbody-brace bar" which proved inadequate, due to my mistake of slackening -not tightening a holding clamp -so I changed the design.Now the "Mark 4" has double "under body" brace bars.

Now, that's certainly a lot better out than in.
This axle is the original 4.55:1 Differential used with the 849cc engine the car was built with.
I have a complete new 4.22:1 set up, which should prove excellent with the 1098cc engine I have to install, when the bodywork is completed.
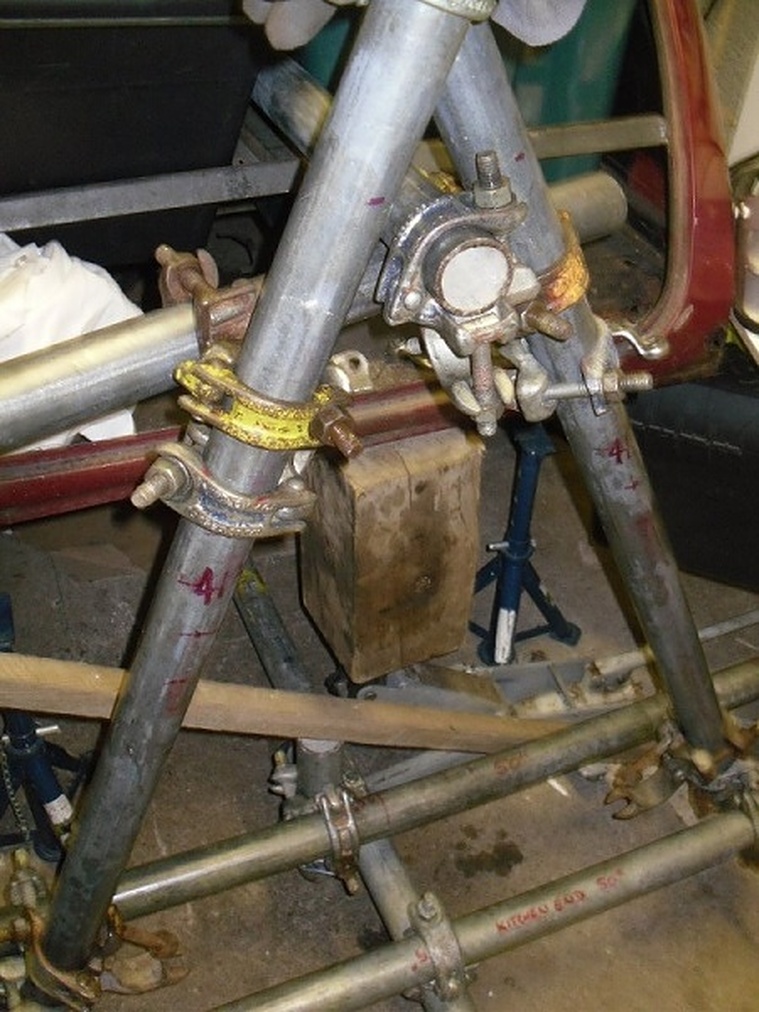
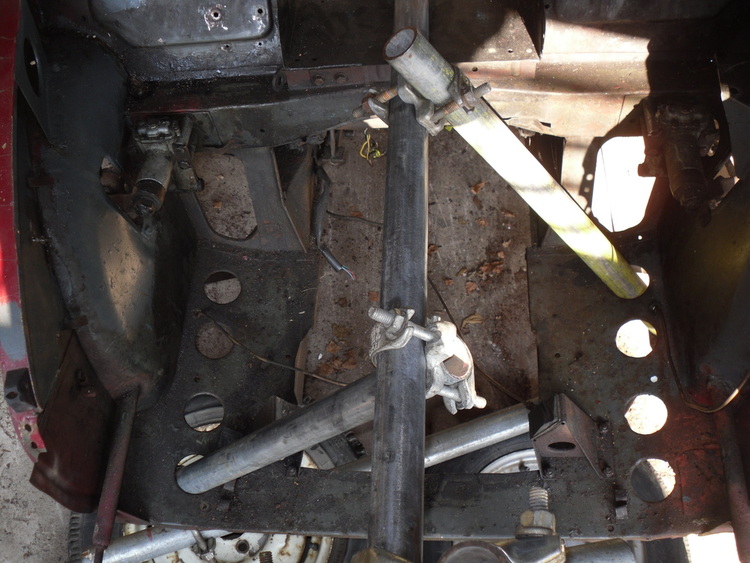
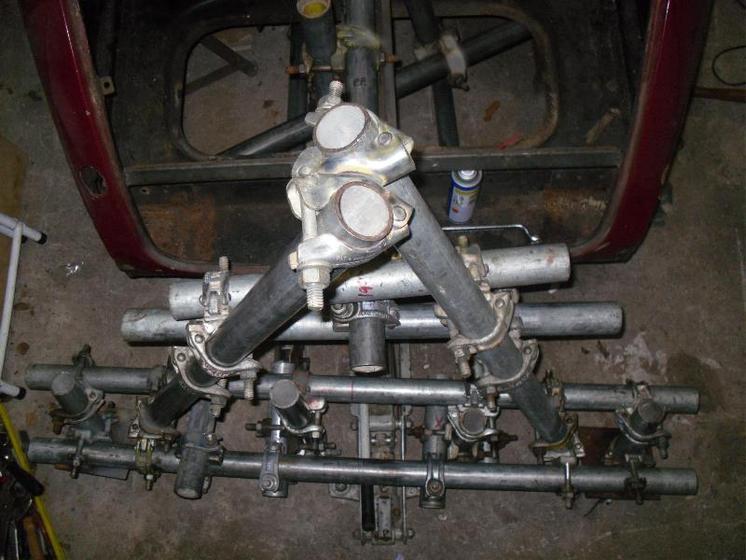
This shows the alignment of the pivot pole as it is in the engine bay. It is intersected by two vertical poles which fit through the engine bay Tie Plates onto a connecting pole underneath.
This arrangement allows the Chassis Cab to be "Locked" to the pivot pole, for ease of alignment and rotated for me to work at specific parts of the body. It is estimated a 95 or perhaps 100 degree tilt may be required ,but more extreme angles can be achieved safely though.
If and when I need to work in the engine bay area ,I can easily transfer the locking system into the boot area using the petrol tank hole.
When testing my rig under full load,I encountered a problem.
All seemed well ,until I wanted the return the under-body connector pole to it's original centreline position. I reached over and using my left hand ( got confused with "Lefty-Loosey") slackened one clip,too much- and allowed too much movement of the under-body connector pole.
Suddenly,when the under pole moved, I had a 6" tilting movement in the rear A frame. As soon as the movement occurred ,the secondary safety bar kicked in and stopped the car hitting the floor .(Whew)
I immediately felt that additional bracing was required (as well as a brain transplant) to stop any clips from slewing in this manner, in future.
Although the movement was caught by two other safety features. It was time to reconsider. Thankfully everything held, and I was saved from a possible sticky end.
I therefore returned the car to stability, on four axle stands and dismantled all the offending items.
I have since thought about adding some additional parts to the rig and reconstruct some others to add extra strength. Some measurements ,and my close encounter experiences, will be posted later for anyone interested. I will double the "under-body connector poles". They will running parallel, equidistant from the centreline. They will be rigged to hang slightly lower than the original. This means that when I then rotate the chassis cab, it will not foul the under-body connector poles.( I have left the full front suspension system in place) It looks to be in good condition.

Mark 4 Rotisserie-slewed over,caught by the second of three safety measures( that's confidence in my design skills LOL).
The chassis cab was approx 6 inches from hitting the floor. You can see the angle the A poles are at and the angle of the wheels on the Base ends.

So here we are back onto an even keel. Axle stands front and back. Rig is detached and dismantled, I am starting to build another version, at the rear, whilst switching to "thinking mode" and a better plan B.
Although this rotisserie system looks decidedly "Heath-Robinson" and to some it may appear "over engineered", I'm convinced it will work well and be a cheaper,safer option for me and might prove useful for other people to copy , if they are so inclined.
In the above it looks like there is insufficient width in the garage, to rotate the car fully-this is an optical illusion.If my calculations are correct there will still be an estimated minimum of, three feet of working space. Not much to some people ,but I am hoping it'll be OK for me.
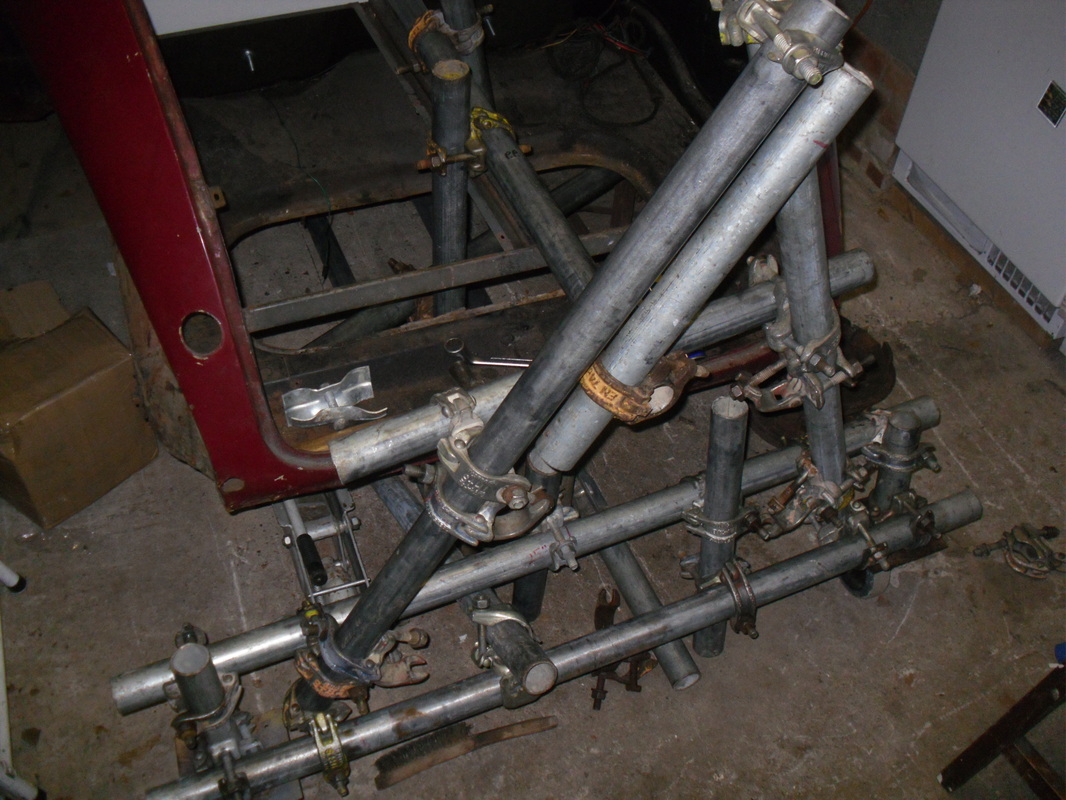
The start of a reassemble of the tester rig of the Mark 5 rotisserie.
I am getting a series of pictures and diagrams together to show the amendments and improvements made from the "Mark 4".
The two main improvements which have been incorporated are (a) changing the front base to the original "goalpost" arrangement as on my original design, and (b) adding an additional underbody connector bar.
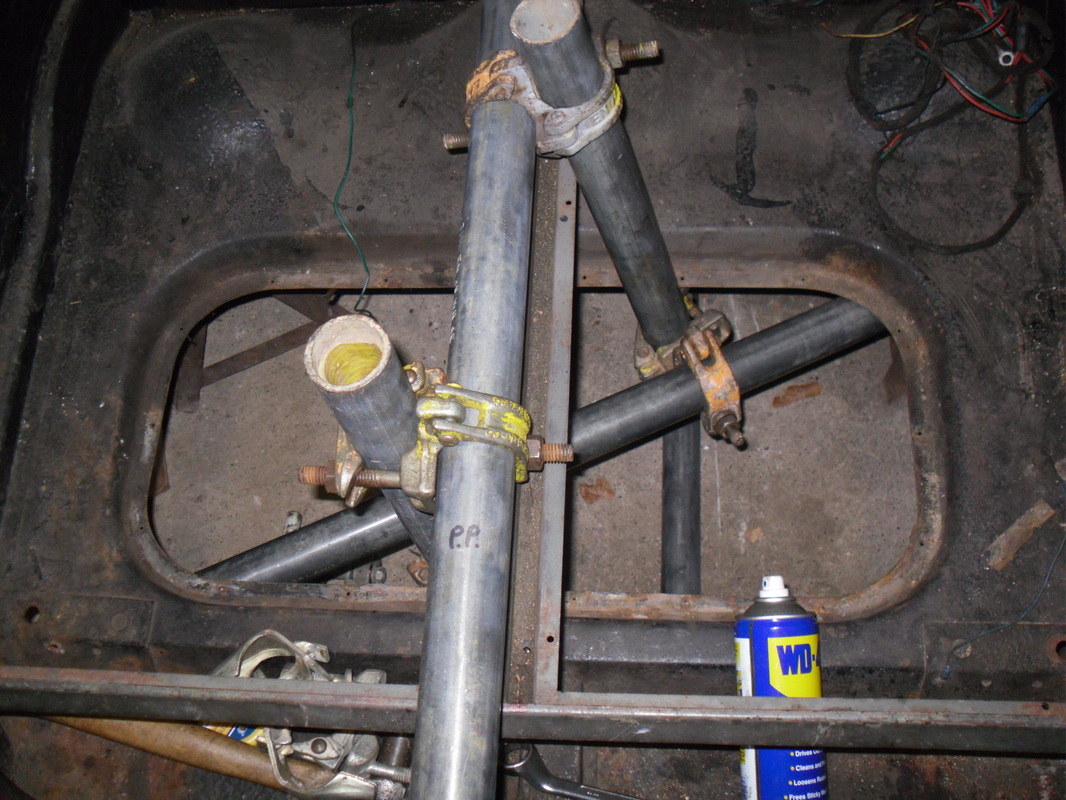
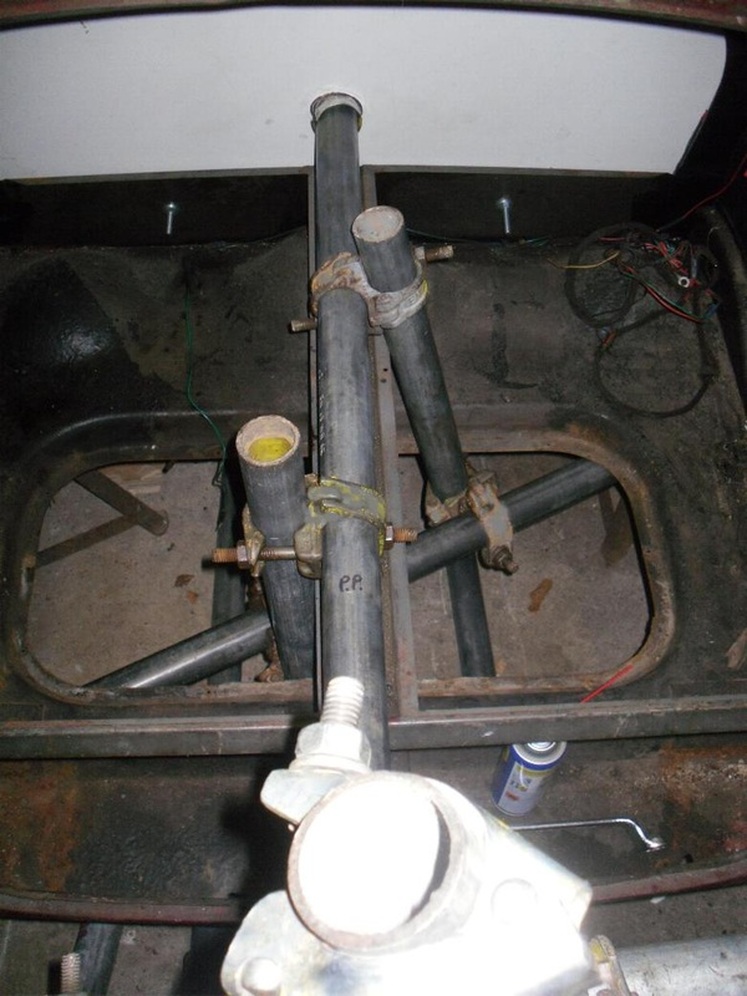
This picture shows another pivot pole "locking" method, this one using the petrol tank opening-this will be used if required when working on the front area of the car when the engine bay locking mechanism, previously shown, is dismantled.
My tester rig has now been dismantled, -the Mark 5 rotisserie looks like its going to be safe , sound and fit for purpose.
The start of the reconstruction today on 29-10-2011,with the help of my Son Andrew- (if he gets this all done today-he will no longer qualify as "Boy Blunder")
This version shows the front base end "H" pole set up,as I originally designed. It was constructed as an "A" Pole on the Mark 4 tester version, I thought I could use the A pole system, to gain the required rotation height and for more space- I was wrong and I underestimated slightly.
The car is shown here, lifted to the maximum height permitted by my axle stands, these are under the front chassis legs braced by wood, and under the rebound stop plate at the back.
This view of the front end shows the very start of the lift.
The car was lifted at four inch increments,by both the front and rear Base ends. The "holding" crossbars and supporting bars, were raised alternately-as a safety consideration (as it was last time).
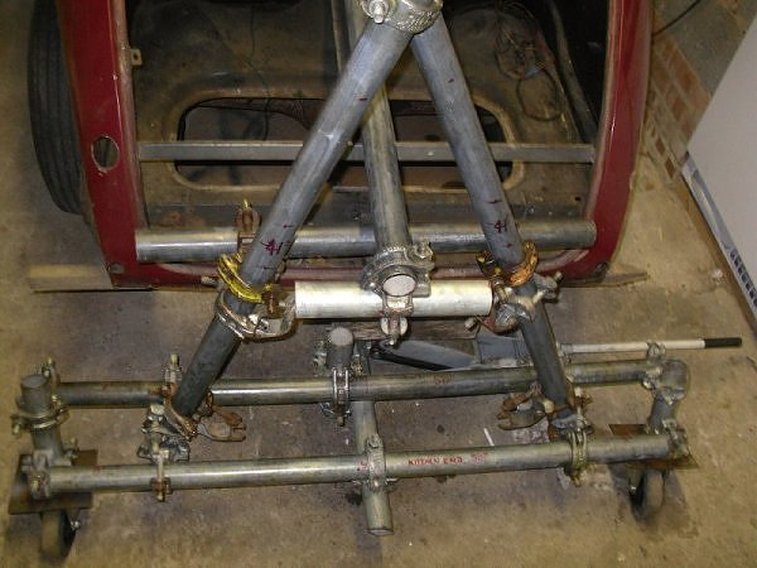
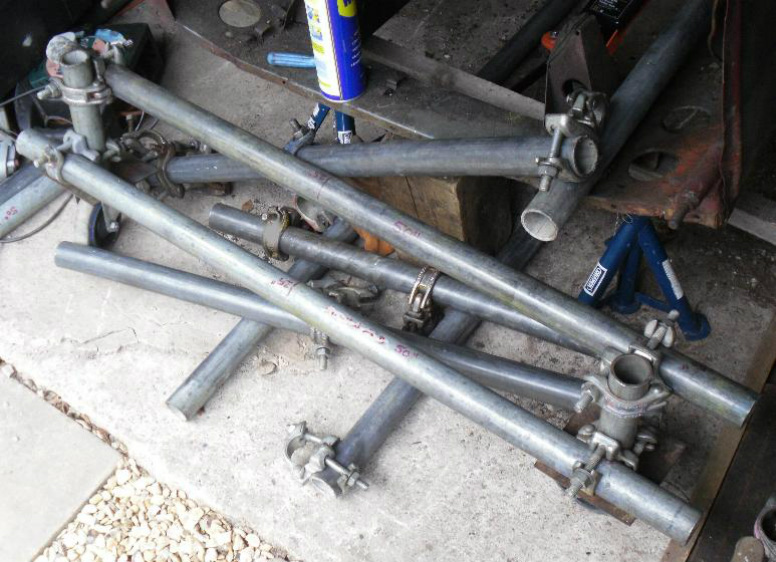
Here is the rear base ("A" pole ) set up. It does not differ a great deal from its predecessors' except that you can see the double "under-body" pole arrangement,with the addition of smaller "double" bracing bars.
This picture shows the very start of the rear end lift.
I have kept the A pole shape at the rear , due to it not having to be lifted to the same rotational height as the front. It also gives me a little more working space on the inside of the Garage
Here is a closer look at the boot area pivot pole "locking" method. The same poles and clips were used in the engine bay previously.
During my testing of the Mark 5. I have estimated that extra strength can be added to the pivot poles, lifting capacity, if another cross-car pole is added to the "inside" of the boot,opposite to the lower "outside" of the boot pole.
All this lot looks quite complicated ,but its all straight tubes clamped to other straight tubes with either 90 degree angle clips or swivels or at the lower parts straight joining clips (simples)
One more difference between the Mark 4 and Mark 5 versions, is that I have trimmed or cut some poles to the required lengths. I was attempting to keep my "Home maintenance" scaffolding poles set, intact. Now all is switched to plan B.
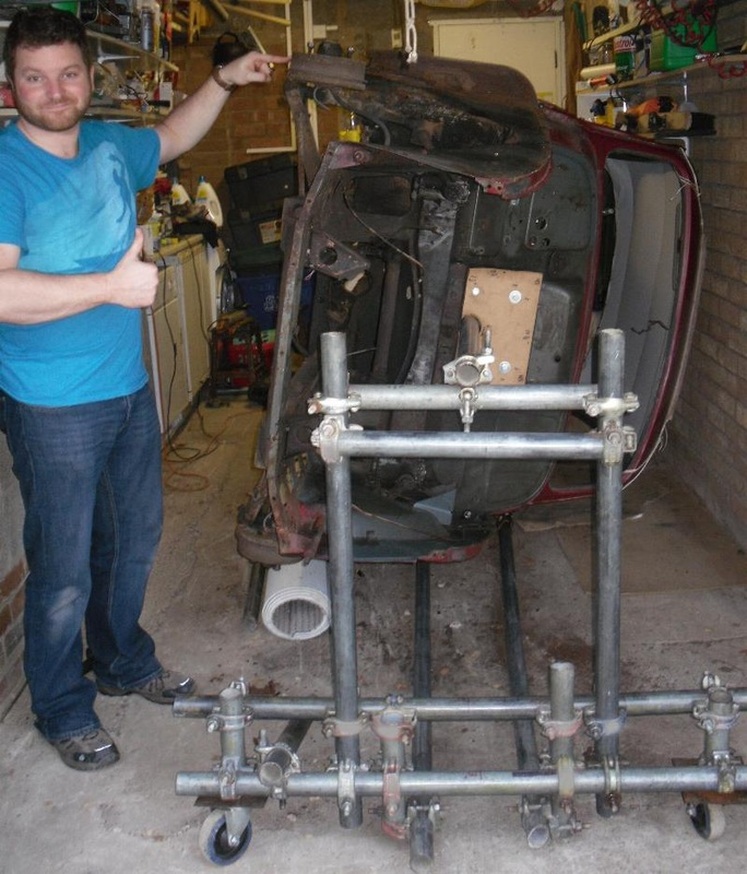
Here "Phoenix" is shown balanced over on "her" side again,this time a lot safer than the Mark 4 version.
This picture shows a good view of the "under-body" poles.
The car is very slightly and predictably base heavy-it turns with ease and "locks" into place very easily with only the pivot pole end clamps tightened.No additional holding methods are used or seen in this picture.
Obviously there will be other holding methods applied before I start "cutting and banging"around "her bits".
Due to the real effort made by ,you know who today,which this picture clearly shows, "Boy-Blunder" has earned his "Burgers and Beer".Keen to show off his handy work (and he's a poser anyway) my Son Andrew.
Due to his,very great assistance today,and once again coming to my aid--as from this moment on-the name he has come to live "down" to --the name "Boy Blunder" will now be replaced by "Handy Andy".He's a great helpful lad (sorry Big Lad)
Now this will give me far greater access,and a decent range of adjustable movement ,to help me make a good job of underneath.
Andrews got a right turn of speed and rate of work ( a bit like Woodywoodchipper really) only not as distinguished, nor technically able.
When the garage door is closed ,and I measure the "working space" available "under the rotated car" we have - 36" or --91.5 Ickies at the front end of the car, and 51" or --130 Ickies at the back end. (so it's big enough for me,my belly and a few tools this winter)
Other measurements for anyone who is interested:-
(i) Pivot pole,vertical height,off the ground= 42" or--107 Ickies at the front of the car and 38 and three quarter " or--98 Ickies at the rear.
(ii) Height at the top sill ,70" or--178 Ickies after rotation and prior to lowering for working on.
(iii) Base end measurement, front 2 poles at 44 and a half " high or 113 Ickies, rear 2 at 46" or--117 Ickies to the Apex.
(iv) The base widths are 4 at 50" or-- 127 Ickies with the wheels 6" off the ground.
(v) Scaffolding clips used in the Mark 5 version are :-
Swivel clips=9
Straight connectors=5
90 degree connectors= 37
Now it's time to make" 'er majesty" an offer she cannot refuse to return the "borrowed" space she has "commandeered" in my Garage, during the period between me building it ( I know-I must do better next time) and needing the space for my retirement project.
My first move has got to be "Get that washing machine outa-'ere". Sadly as of the 24-12-11,I think I am going to have to forego the pleasure of saying goodbye to the "washer". It has to stay-I fancy staying "happily married".
Well, I left the car overnight 17-11-2011,no sag, no movement and no bl@@dy bolts being undone by some idiot, so no mistakes this time.
So the system now ,at long last, can be seen to work well and has enough safety features on it , which should allow me to gain enough seniority, to draw my additional "Winter heating allowance".
I must get more "liquid replacement substitute" or more "health food additive- in liquid form" for the beer fridge in the garage .You never know I might been needing some when I start on the "letting in of the metalwork" . I am now at the end of phase 10. (Only another 12 to go)
This has been a very busy 2 months since the last report made on 03-09-2011
The latest renovation items obtained are:-
Additional body panels obtained from my mate Alan- Woodywoodchipper -along with a nod and a wink.
Mogmad56 has supplied me with an HS2 Carburettor rebuild kit (charity donation) a gear lever gaiter and a much needed front door hinge that was subjected to some verbals and GBH upon removal-FOC.
Dave S supplied a clutch relay shaft and rod FOC.
Chesney sold me a Main cross-member end for a £5, I might need more for the middle and the other side as yet.
Box section steel donated FOC.
Date of specs = 05-11-2011
The number of days owned =641
The number of days worked on it=56
The number of hours worked on it=123
Total spent to date (not including Labour)=£692.00
Approximate savings made=see below *
PEED-OFF=211 days
As I have now fully tested the rig and all now seems (is) safe and fit for purpose, I rotate the car back upright and level it ready to fit the brace bars inside the Chassis Cab.
Date of specs= 17-11-2011
Number of days owned-=653
Number of days worked on=56 +2 + 58
Total costs to date=Same as above.
Number of hours worked on=123+5 = 128
P.E.E.D-O.F.F= 199
Total spent to date=£692.00 (excluding labour)
I am presently cutting steel box sectional pieces to weld into the cab as body brace bars-when I can make up my mind as to how much space I will need to work, inside the cab when doing the floors and inner sill step repairs.
Then when I have planned,cleaned up and cut these bars they'll be ready for welding into place.
I am planning to remove the headlining , (grinding sparks etc.)-dash controls out, steering column out .

Still taking things very slow and easy,don't want to have a relapse.
Phase 10. This phase is imminent, and will be the longest phase of the whole plan-involving the complete renovation of the bodywork. It is one which many people would maybe find daunting, but I am quietly confident that everything is in place to give me a successful outcome. The monococque was finally suspended, weight tested (as fit for purpose), measurements taken and recorded all by 29-10-2011.
So it could be said that the final obstacle has been removed from the mid point of the project, and that is my full access for the required body repairs.
Providing all things "physical" stay as they are ! I have taken a chance with publishing a provisional plan of action towards completion.
I am hoping to have the cab area braced and all final measurements checked and fully recorded, on my 4 door plan, by early in the week.
Specs date=13-12-11.
Number of days owned-=680
Number of days worked on=60
Number of hours worked on= 128 +3+ 131
Costings the same.
P.E.E.D-O.F.F= 173
I have removed the headlining,the steering wheel and column.
Then I hope to be on the way to start metal replacement (week commencing 11th December) 2011.Starting in the Boot area.
The Christmas break played a part in delaying my timetable-but hope to catchup afterwards.
Last website up date was on 24-12-2011
I have not hitherto set myself any "hard and fast" timetable,other than to mention a PEED-OFF date,as a general guide.
But now I am going to try and get some additional focus (health issues notwithstanding) and publish the below date and timeline.
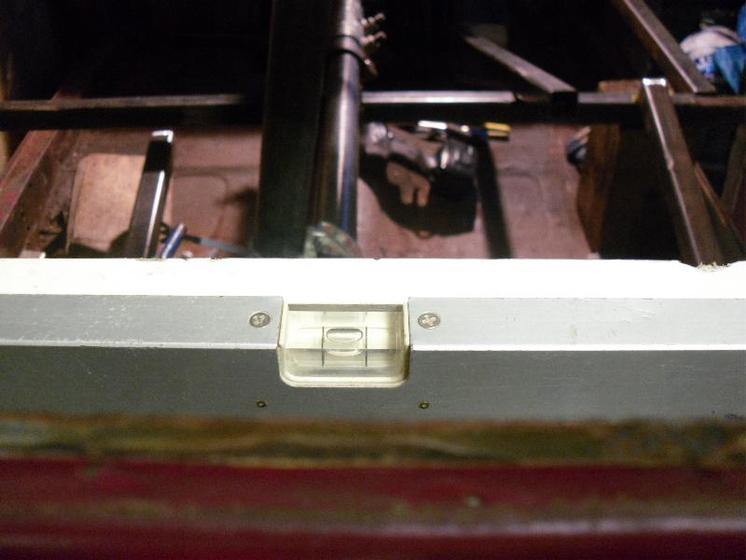
Well I have started fitting the bracing bars, I rotated the car back down again and after levelling it as shown with the rear parcel shelf as guide made a start.
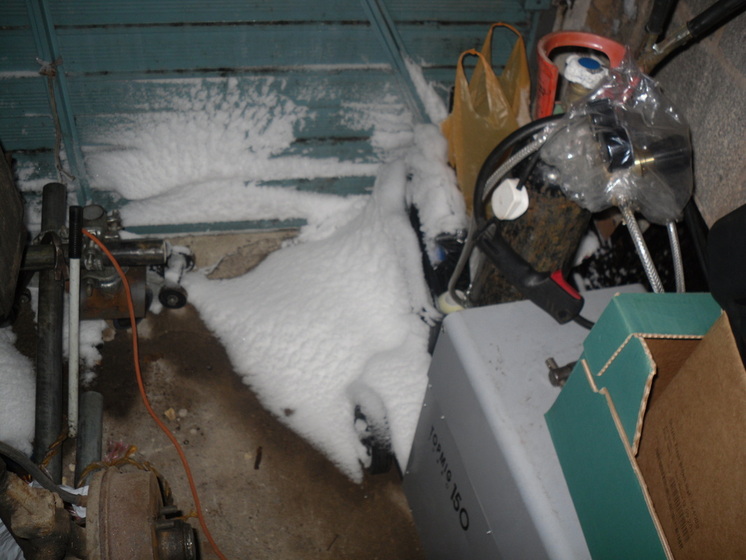
It seems that "someone" left the Garage door ajar on Saturday-so here was the sight that greeted me when I returned from work.
Today was the 51st Birthday of "Phoenix" 09-02-2012Well-to be absolutely straight- the date was the actual anniversary of the cars first registration at Jones Brothers Garage in Pwllheli North Wales, in February 1961.
I was hoping to collect 4 special spares items (Wheel rims) from Southern Scotland today, whilst taking part in a photographic session, but events transpired against it.
Set off at 7.30 bright day but snowy patches, the early weather report was not brilliant but-it is winter. So packed the usual "winter" gear plus a "Butty Box” from the Scouser and away the noooo.
Radio warnings immediately mentioned the A66 Brough Appleby route over the M6 –M74 was closed due to ice and severe weather, I then thought about the A69 Newcastle-Carlisle route but that route became blocked by accidents and ice ,and as I got up to Durham the A1 (M) became blocked with high volumes of re routed traffic. It took an hour and a half to travel from Durham to South Newcastle.
It was raining and ice was immediately forming on the ground some solid and some of a more slushy consistency. The screen wipers were clearing ice too which at times piled up on the sides of the screen-a strange sensation-for about half an hour. It was about -6 for about half an hour then got warmer. It looked really strange it being very cold but with rain not snow being the problem.
As there were severe weather warnings for both North Yorkshire and Southern Scotlands main routes, I reluctantly turned around and eventually got back home at 2 pm-empty handed but safe to travel another day.
So a bit of an anti climax, all in all, but lived to travel another day.
Don’t know how the “Professional" drivers do it rain or shine-sleet or snow.
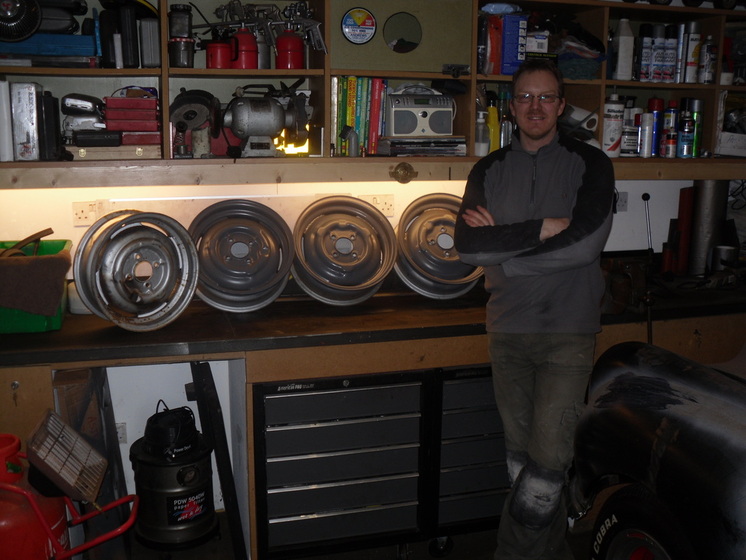
Posted: Sat Feb 18, 2012 7:36 am Post subject: Here’s a pic I’ve been waiting to take for a while.
With the weather behaving itself, I managed to get away this Thursday 18th Feb,and pay a visit to Graeme (2fry) up in Southern Scotland, here he is-
“Himself” with the (my) rims,(Lounging in his posh Lounge-Garage ) and my rims atop his engineers bench, all ready to load up into my car for the trip South (ish).
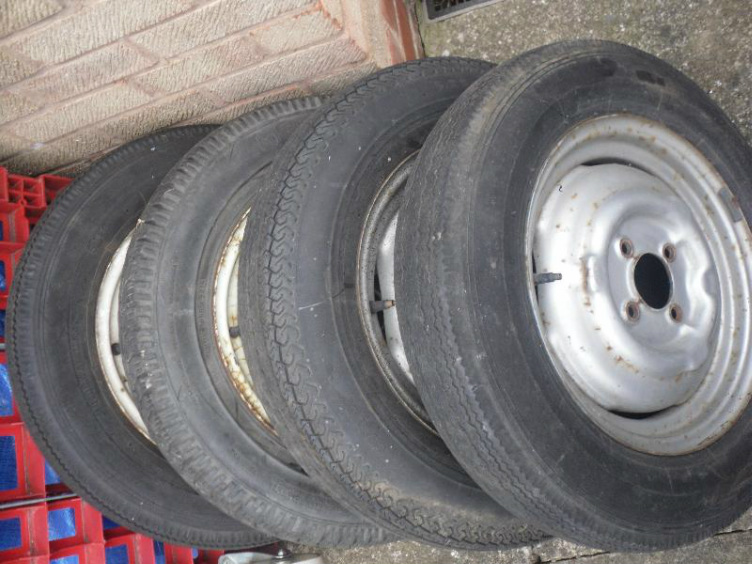
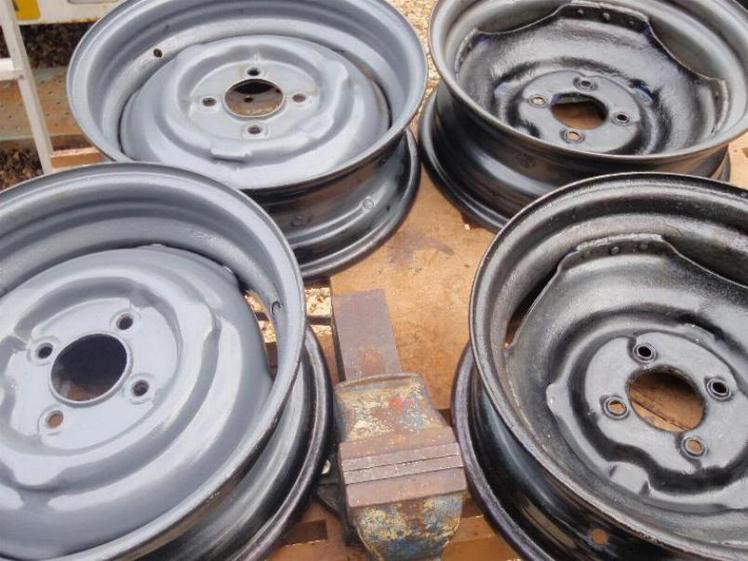
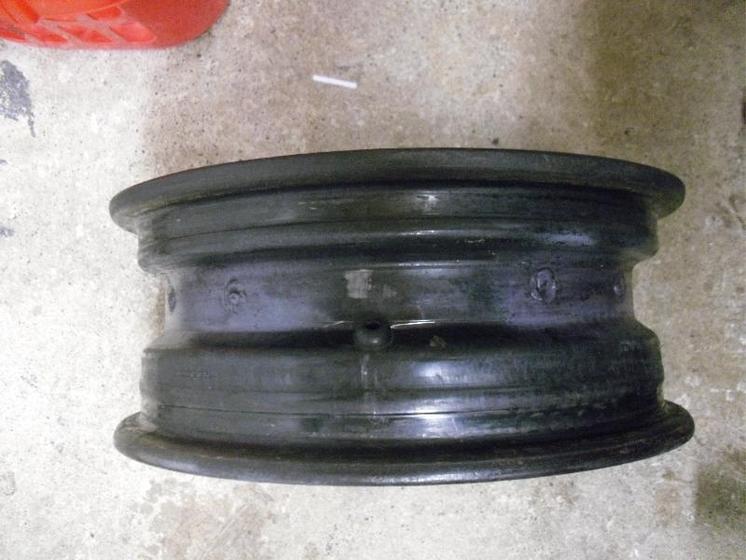
4 standard rims of the sort used to create my special rims.
and below one of the standard rims-hooped to a six inch steel rim,showing the slight dished effect that I was hoping for and created by Graeme in these Mark two version, this one is ready for skim cleaning and painting up both inside and outside with Jelonite first.
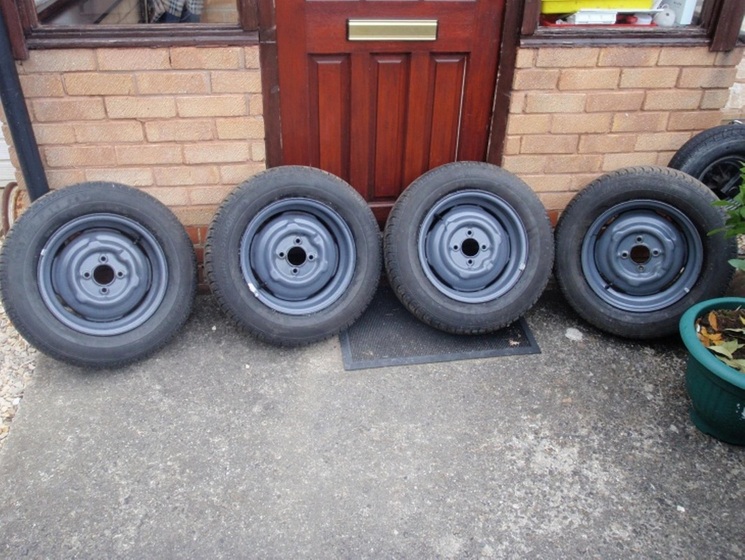
All four main rims cleaned, Jelonited and painted ready for the tyres fitting
Showing the top clearance which is always "the" critical measurement when opting for wider rims,here we are well clear,even allowing for the tyre spread out from the bead to the tread corner, of ten sixteenths.
T
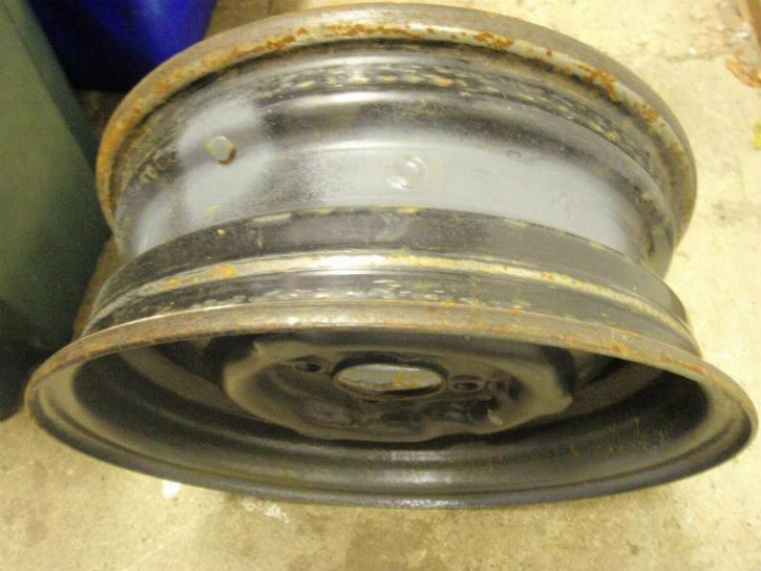
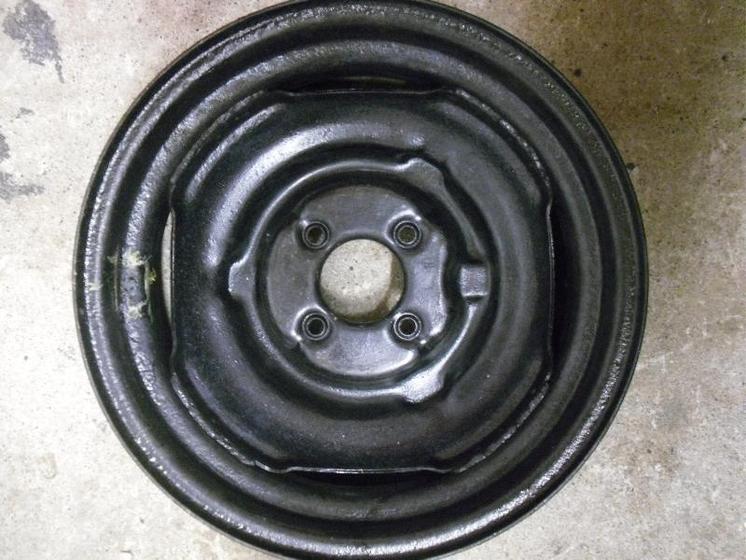
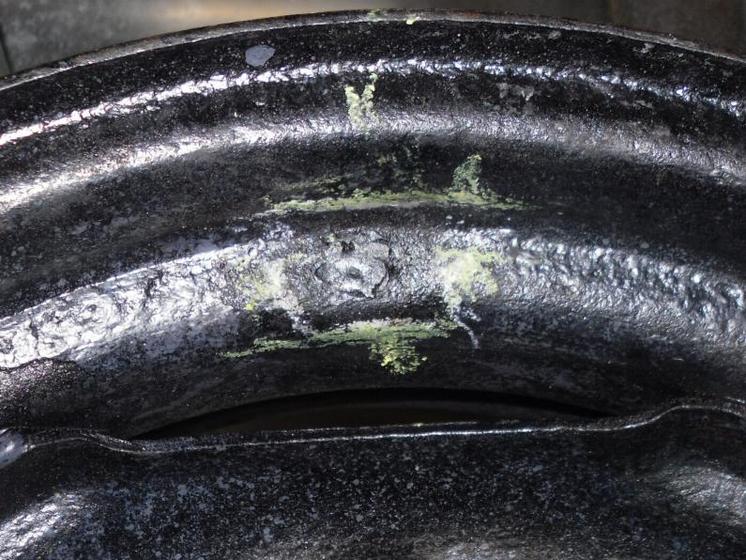
Here's a clean picture of the inside of the leaking rim,it is the plug welded hole ,where the original valve hole was,which is leaking, this is now on the inside of the hoop now it has been reversed.
Here is the inside view of the actual tiny hole which was discovered by my mate Chris at ATS.
I have since had a few -quickie suggestions- of how to remedy this small problem, from "Tiger Seal" to a plastic metal type of application, but I want to try a little welding if I can first, that's how they were first created and I believe, it will be a stronger solution-we shall see.
Now I have to say, these new rims actually came out better than I had hoped, they have the right amount of dish (inset) and in some respects look very similar to the original heavy duty van wheels.
I wanted a slightly wider wheel to fit a decent more "modern tyre" too, even if the car is virtually bog standard in nearly all other respects.
Graeme did a fantastic job.
I have had tyres fitted to these rims-185-70-R-14's and gone Tubeless also .One slight leak detected-took seven days to drop down to 15 psi-the leak is actually from the new weld that was done to close the original valve hole,now on the inside of the rim.
I had them test driven by "Chesney" Jack of the mmo forum, he gave them an "enthusiastic" drive on his lovely little black 2 door "Sophie" .
Overall assessment, feeling of the car and driving seemed to be a lot better than the standard wheels he has fitted at the moment. That'll do quite nicely for me.
I am hoping to have some additional pictures showing the fitment and a few other pics of test drive day.
My thanks also go to Fozzy (mmo Forum) for offering to help test drive my new rims,but as I was going past the road end where Jack lives,on my way to Liverpool, so I took up his generous offer.
I’ve already got a standard set of rims (donated by "Little blue pick up") in the shed along with decent set of 155’s,if things don’t work out with these “Specials”. But I’m really hoping that when I get my mate Chris (ATS) on the case, that these are going to be as good as they look (imho.)
These are made up of standard rim centres, in really excellent nick, the Mark one version was made up of MGB Rostyle hoops which were fault free and as smooth as a Billiard ball. These Mark two
Well due to the usual things I have been unable to crack on-as planned but even though my approx timetable has had to take a back seat-I am still hopeful of making good progress this year.
Specs date=16-02-12.
Number of days owned-=707
Number of days worked on=60
Number of hours spent or worked on= 131+8=139
Costings the same.Plus £20 offset costs with art work-commissioned rims
P.E.E.D-O.F.F= 106
Sadly no progress has been made-still hopeful and remaining positive 09-06-2012.
Mean while I have added the below, to my list of "Gotyas" and crossed them off my list of ,"Yet to Get".
Gotyas=
2 later type of glove box "inners" both in good condition and ready now to fit.
A full set of "Minor " centre wheels with six inch rims.
Clutch alignment tool ( haven't got a clutch yet LOL)
Set of 16 front grill chrome finishers
Brake drum set 7" and 6" de rusted with vinigar and then "Jelonited" ready for paint.
Fan belts
Set of chrome wheels nuts (there's posh for you)
Service History record book (new-blank one) ready to start all over again.
Pair of original engine "Lifting Eyes"
Spot welding drill bits.
Fibre glass front.(already got 4 wings)needing some more work though.
One near side glove box lid (wooden insert needs replacing)
Steering wheel horn push top (now only short of the inner spring and plunger.
Battery angle bar and J bolts and nuts
Engine mountings= pairA working fuel tank sender unit4 door sill finishers I had a “Stainless” set of 2 door ones (surprising how much I’ve learned from making Cock-ups LOL) I swapped them with good old Andy MOGMAD56.It might seem that Andys name comes up a lot when looking at the amount of items he has donated to the project (some say the car should be re-named)
Carb throttle return spring-Andy
Both handbrake cables -ebay deal
Rear Axle “U” bolts 5 leaf type.-Andy
Inside -Rear view mirror.-Andy
Horns FROM ANDY
Hub retaining screws 2 (4)
Locking fuel cap,and spare keys too-Andy
Brake shoes all round-8” front 7” rear.
Front door check strap (bar,bracket and screws-NS)-Andy
Gearbox steady wire FROM ANDYSets of door hinge bolts and screws FROM ANDYRear Axle “U” bolts 5 leaf type. FROM ANDYProp shaft bolt set—FROM ANDY
3 Rubber bushes for underneath the wiper motor. “17H5431” FROM ANDY
Front door check strap (bar,bracket and screws-NS) FROM ANDY
Hub retaining screws 2 required. As above-ANDY
Bonnet rubber buffers. FROM ANDY
Locking fuel cap FROM ANDY
Inside -Rear view mirror. yes you guessd it -from Andy
My "Yet to Get" list however is getting shorter-“Yet to Get” list 2012.
A drivers side front door, rubber door seal protector-its a really odd shaped bit of metal-attached to the "B" post, I don’t know if they're handed but the OS drivers side is missing.
Under body -exhaust heat shield and pad.(non asbestos)
Front and rear windscreen rubbers ’61 –not split screen-but with clap hands wipers-Later type ?
Front windscreen (silver coloured)plastic insert.
Rear drop links -2
Leaf spring retaining bands for my 5 leaf type.
Plastic advance and retard pipe.
3 piece clutch kit.
Bonnet and boot seal rubbers.
Rear shackle pins and nuts (got new plates)
Starting handle.
Prop shaft bolt set
Heater rubber pipes and clips.
Braided fuel hose from pump to carb.
Wiring Loom-Dynamo type.With Semaphore arms.
Seatbelt set –front only.
Set of gaskets for bonnet and boot hinges.(or make from high density carbon rubber)
Door seals full set including draft excluders for all 4 doors,and including felt strips and clips
Bonnet rubber buffers.
3 Brake flexibles
Rear Spring locating plates and pins.
Negative earth battery leads.???????
Hose=tappet chest to air cleaner /carb.
Front headlight-plastic bowls-gaskets and adjusters (side light inside-type)
Oil seals-all round, crankcase/gearbox, gearbox/prop shaft- prop shaft to diff pinion-hubs all round.
Copper fuel line pipe rear to front.
Items that I have which can be used to “Exchange” in lieu of -or sell .
2 front metal wings –excellent condition (I am going to try and use some glass fibre ones I got.)
Later type of steering rack with gaiters
4 standard wheel rims not bad or too rusty (I suggest rebuild use only,they have tyres on them ,but they are old 520-14’s)
One 4.55;1 Diff cage complete, good runner (Iv’e gone up to a 4.22;1)The 4.5;1 is now going to a new home,with Chesney,I have bought a 3.9 from 2 fry which will fit nicely into the project (when we get started again)
Later type-1098-wiper motor.
Good set of 2 and 4 door kick plates-sill covers
Gold faced speedo.
Black faced Speedo
Later type heater box complete.
Front bumper complete with over riders.
Petrol tank from a 69 traveller. 6.5 Galls.
2 spring leaves- 7 leaf type.Given to 2fry for onwards distribution (saves me a bit of space)
Floor dip switch
Standard front hubs with –no play- bearing set.
Starter motor.
Bonnet blade trims -2 pairs.(One pair given to Ohc-Turbo.)
Half shafts Engraved as Left and right when removed.
Assorted body panels-smaller types, no longer required-pm me for details.
Anyone reading this who can do a swap-either way- or any items to sell ,which are on my list-please let me know,through the mmo forum.If you are not a member,its free to register and then just send me a (pm)personal message.
Listed-but yet to check off and deleted when double entry seen on list published before 09-06-2012
“Yet to Get” list 2012.
A drivers side front door, rubber door seal protector-its a really odd shaped bit of metal-attached to the "B" post, I don’t know if theyre handed but the OS drivers side is missing.
Front and rear windscreen rubbers ’60 version –not split screen-but with clap hands wipers-it may be listed as the Later type ?
Front windscreen plastic insert (silver).
Rear drop links -2
Leaf spring retaining bands for my 5 leaf type.
Plastic advance and retard pipe.
3 piece clutch kit.
Bonnet and boot seal rubbers.
Rear shackle pins and nuts (got new plates)
Starting handle.
Heater rubber pipes and clips.
Braided fuel hose from pump to carb (or normal heavy duty petrol pipe) instead.
Wiring Loom-Dynamo type. Seatbelt set –front only.
Set of gaskets for bonnet and boot hinges.
Door seals full set including draft excluders for all 4 doors.
3 Brakeflexibles
Rear Spring locating plates and pins.
Negative earth battery leads.
Hose=tappet chest to air cleaner /carb.
Front headlight-plastic bowls-gaskets and adjusters (side light inside-type)
Oil seals-all round, crankcase/gearbox, gearbox/prop shaft- prop shaft to diff pinion-hubs all round.
Brake shoes all round-8” front 7” rear.
Copper fuel line pipe rear to front.
As they say-the best laid plans of mice and men. The dates that were published on the run up to the Diamond Jubilee Carnival show and celebrations are now deleted. The below timetable ( Dates now deleted) has gone somewhat askew,due to health issues, but it is still highlighted, so I can see where I should have been to meet my unofficial deadline, also it still shows the planned phase order.
Still thinking positive.
*** See all the notes hi-lighted below 12-12-2012
Making a start on the Boot area I am hopefully moving on to-rear chassis leg- up the off side- c post -sills and under floor panels-spring hanger- b post area- a post and inner wing- front chassis rails-engine compartment-near side inner wing-a post-sills and under floor area spring hanger-b post- c post- floor panels and rear chassis rail- rear inner wing repairs- near side roof rail repairs.As assessed at the moment, but of course things could develop as I proceed with the work.
Wish me luck on that date then !
Phase 12. Checking all fitting of new metal.I mention here that when the Sills and boxing plates are renewed, A to B and B to C post repairs - all doors will be temporarily refitted (as stripped out shells) to check alignment gaps. Same will apply when the Bonnet, wings and boot area repairs are completed, as appropriate.
Phase 13. Derusting inside Cab and finish letting in any required new metal, apply rust killer acid then seam seal above and below, with the application of primer and or undercoat, Waxoyl to box sections and Boxing plate areas,after-top coat paint ? Complete the underneath-electrics, fuel, handbrake wires and brake pipes. Prepare and renovate all detached panels-doors-bonnet-boot lid- front and rear wings.
Clean off and fit appropriate oils seals to engine block , gearbox and differential. Complete brake, bearing, suspension bush overhaul-when safe and appropriate to complete.
Phase 14. Sealing all seams and paint prep, including all running gear, fit the road springs with new bushes, shackles and drop links-move the new rear Axle underneath. Prepare the prop shaft and finished axle for final completion. Fit the older "renovation wheels"to the new Axle. Complete all underneath work, fit sound deadening pads throughout the inside areas that is permissable, prior to making everything ready to lower the car from the rotisserie, onto the rear axle. When finally back on the ground do a complete front suspension rebuild with Polyurethane bushes .(The rear end will be done during the Axle rebuild and final fitting)
Phase 15. Final paint prep on other items as required, including all ancillaries-Doors-Bonnet-Boot-Exhaust-Grill-Radiator-Wings-Lights-Running gear-Trim-Bright work-Engine-Gearbox--wheel rims and new tyres 155-70-R14's (if not using the ones commissioned specially for the 185-70-R14's tyres I have already). Final purchase of all missing items, on the final list.
START OF CLEAN PHASES- really looking forwards to this final set of phases.
Prepare a “clean” garage
Phase 16. Test fitting all main body items, (except engine and gearbox) adjust the wings, bonnet, boot lid and doors as required, then disassemble before final painting of new body colour, top coats. It is hoped to use my Rotisserie (as originally intended) as keeping the Monococque body,fully mobile for this painting phase.
The colour idea of returning it to a Morris "Grey" (Yukon) as it was originally, with Maroon interior,that has now taken a back seat (no pun intended)-My good Lady has decided that the car should be a Morris original colour, maybe an English"White" or even an "Ivory White". As I want to have it as near to original as I can-without going overboard- White has been selected. This colour was used over the same time period as the original Yukon Grey,but this white continued to be used for a longer period, so it fully in keeping with the production year of 1960. The car will be fitted with a Maroon -Red interior-the original headlining and door cards will be used also, but exact specifics will be sorted later.
Phase 17. This phase is to have the “wheeled monococque” fully painted, (maybe home painted-by rough roller,depending upon quality attained) this means painting the chassis cab body,both inside and out- along with other main items, which have just been renovated, but not attached to the main body. For example, all four doors, all four wings, bonnet and, boot lid.
Phase 18 .Will involve the re fitting of everything - (including engine and gearbox), gearbox cross member and stay wire, fuel tank,front suspension that has already not been assembled,brake pipes all round,fuel line, handbrake system,bump stops,new loom electrics, Semaphore trafficator arms, dash controls, front and rear windscreens rubbers, rear springs,wiper motor and linkages, head lining, interior mirror and light,interior trim, seat belts (non were fitted originally) ,custom built seating and carpeting with good quality underlay and sound proofing. Assemble all door glass and furniture to be rebuilt etc.Then final paint touch-ups and waxoyling any items missed or planned for later. lift up onto rear Axle stands.
Phase 19. Fire up the engine- and test all running gear as much as possible. Rectify problems arising
Phase 20-Change from my renovation wheels, to newly commissioned rims and tyres-which mirror the slightly wider wheels of the Morris Commercials-using standard centres with the Morris Logos on the hub caps.
These wheels will have been previously balanced-with tracking done (the old fashioned way) until it can be done by the local garage. The headlight alignments will be checked-pre MOT , this also involves a full check over by an fully qualified independent engineer.
Final “snagging list” and a good clean all round and maybe a body polish, if the paint allows.Phone for an MOT appointment.
MOT test Amend or fix MOT failure problems or advisories,(or have a party,whichever applies) and /or re submit immediately.
This " milestone "phase of my project will hopefully see “Phoenix”, with a Certificate that she has not seen for since about 1973 I think. Then to change her insurance cover from off the road in the Garage having a renovation, to being fully comprehensive cover on the road with an agreed valuation figure , supported by the Rebuild manual Log book, and website record.
Final record.
Phase 22- to write off to DVLA for her “Historical” Tax Disc, to be displayed during the ,reborn phase of her existence, hopefully to see her exist for another 50 years.
End of project.
It is my intention to enjoy keeping the car on the road, and use it as a daily driver ,throughout and well into ,my "Senior Years".
No doubt Madam "Director" will use it occasionally,even if she says she will not want to reminis about her '70's Almond green saloon.
With this regular use it can be assessed and maybe tastefully modified to make it a little more "user-friendly" to less "Moggy" nutters.
I am hoping in the future to, “enable the car to be used as a unique historical vehicle ,with some modernity, which will not detract from its Historical status and feel".
Project costings.
* This total is come about by the actual money saved by donations of car parts-free of charge- by enthusiastic members, who are all named above. One member however did not want to be named-but my thanks go out in no short measure to all.
This is the end of another phase of this cars history-I wonder what the next 50 years will bring ?
***Sadly on the 12-12-2012,I had to reach a decision,due to powers beyond my control,to stop the project.
I now continue my project with another 4 door Saloon of the same Series 3 variety.It is a vcar built in 1958-first registered on 2 feb 1959.
This car and is very very similar to just what project phoenix would have appeared as or looked like externally.
My Wife Lynn has been instrumental in this "new to the scene" retirement car ,as without her encouragement,enquiries and proficient handling of the budget ,this would not have been at all possible .She will defo need to be rewarded by a very early "test" drive in it -all by herself. (after-all her first car as an 18 year old was a Almond green 2 door Saloon ) This car will not be in the Lloyd household until early in the new year,so I shall continue this story of my retirement project then, It will no doubt be a continuing story of finding out the little foibles and faults of this new (old) car and posting up my problem solving as I get into it .
I do hope that other people who plan a similar journey-towards the end of their "Big" journey,will find it interesting and informative and maybe a little entertaining too.
Project "Phoenix" will continue, but in the hands of another Minor enthusiast.
02-01-13,I heard today that a good friend and fellow MMO Forum enthusiast is willing to take on the project.
His name is Jack and his Avatar is "Chesney"
Jack and his Father,who have been holidaying in France over Christmas and the New Year,have reached a decision to take the car on.
I had another unequivocal offer from BarryJ1979 also who contacted me after Jack had expressed an interest,and as the expression goes (has second dibs).
It was very good of them both to express an early interest,for that I am most grateful to the both.
Collection day is Friday 18th January 2013,Jack will be here- watch this space.
Well "Phoenix" has sadly flown the nest, collected yesterday,as arranged above.
I shall try to post a picture here showing the main action of yesterday.
Watch this space.
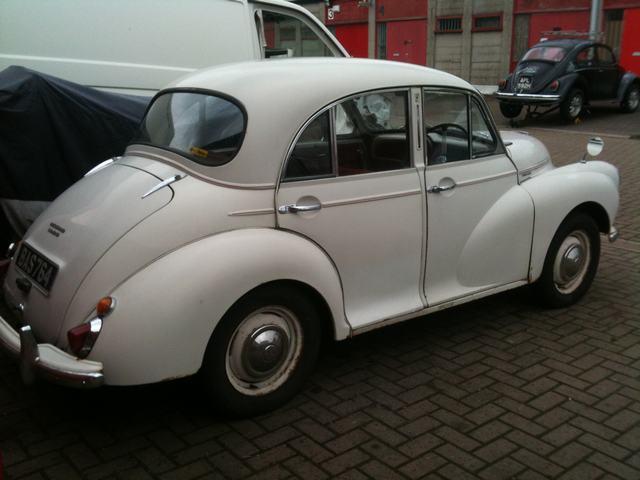
Rolling refurbishment-and long term ownership- of a Series 3 Morris Minor, 4 door Saloon of 1959 Vintage. BAS 764 "Mr Faulty"
Hello all.
I am making a fresh start on here, with a brand new thread, on the above vehicle, which is waiting in the wings.
You might think I’m a little early –starting this thread- but, there's nothing like be well prepared. ;)
This car is being collected by me, in person, in the very near future.
It is presently being prepared for what I shall call, an adventurous 200 mile journey, well for me at any rate, with a little help from my Son.
The drive, up to the hallowed ground of Yorkshire LOL, from that lovely County of Kent, “The Garden of England”, is something I eagerly await.
The car was found,and purchased by my Madam Director, "Lynn", on the internet-through this great Morris Minor forum=morrisminorowners.co.uk.
She was looking for some way to cheer me up (miserable s*d) and help me feel better about the failed project restoration of another 4 door, = Project "Phoenix".
This new (old) car had apparently been offered for sale, quite recently, but was withdrawn almost immediately, after the gearbox failed when being driven out and about, checking that all was well.
The car had been spotted as being for sale, but as it was then with drawn almost immediately, it was discounted.
A short time later, there was a remark by a “certain” furry footed individual-who helped me create this website,which implied that another " certain” distinguished member from Essex, had a a few spare gearboxes down the side of his workshop/garage-well, this comment was picked up on almost immediately, by you know who.
There was a personal message sent,regarding a serious interest in the car changing ownership, and a short while later-Bang, the rest is now Forum history.
The car has a current MOT :D ,for a little later this year, (although as from Nov 18th last year is now exempt)and of course has attained the status of historical road tax.
It is a '58 early series 3, in Pearl Grey.
This colour was originally thought to be Pale Ivory, but a production numbers check, against the dates these colours were used, ruled that out.
It still has the standard, original 948cc engine, recently rebuilt, with a newly replaced smooth cased gearbox, with another a fully functional spare, all as part of the deal,(many thanks to Mr Mick Essex and of course the present owner Paul Villiers.)
I'll be the 5th owner, of this very original car, and looking forwards to some interesting times during its usage. It is being well prepared and looked at by a trusted source, so I have no doubt that , that everything will be well.
The price was arranged, and the deal completely, all done (the old fashioned-and time honoured way- of a gentleman’s agreement.)
The car is in need of some TLC, especially to the bodywork paint, but nothing major is expected for a good few years as yet as it has been well cared for.
However:-along with the paint, the upholstery, basic mechanicals and the continuance of anti-rust measures, which will all be in demand- I suspect this is the case of most of these great little cars.
This rolling refurbishment is a far cry from a major overhaul which is what was required in my previous project, which sadly, I failed on, but that was beyond my control.
I believe that, as much as I could not continue with the total rebuild of project "Phoenix"-, because of certain difficulties-I will be very much “up” for this rolling refurbishment.
I have to say that the initial attraction of this car, to Lynn, was that this one looks very similar to what the "failed" project would have turned out like, white exterior with a red/maroon interior.
“Nothing to do it’s condition, the engine, running gear, or the historical links of the vehicle ":lol: :lol: :lol: Don't you just love these optimists?I had better stop there!
The main ideas behind the previous project car, was to rescue it from oblivion, and keeping it fairly standard. This strategy would allow using it, as much as possible as a restricted-daily driver, and yet showing it, by attending any rally’s or carshow events.
Part of those original sentiments holds true with this one-keep it as original as possible (nothing to do with Concours,which of course is a whole new very specialised section).I intend its use to be mainly a Summer time daily driver, and attend variuos shows. The expected odometer readings, may show an annual 1,000 miles covered only?
This car still has its original deluxe leather interior in Maroon and red, with what’s left of the original maroon carpets, which are all presently, a little worse for wear.
I intend replacing or changing certain Items, especially when considering some safety aspects to help the restricted daily driver aspects, of ownership.
The UK -VIN Code (Chassis Cab) plate details are M/AS 3 D 698735 which means built at Cowley in 1958.
I have have yet to receive the full paperwork on the car, but I have found out it was made shortly before February 1959 when it was road taxed,but quite early in that year’s production run, actually within the first 6,000 early cars made.
If all goes to plan, my Son will be driving me south to collect the car and then riding shotgun on the way back “up country”. He hopes to be able to be sharing the driving-if he behaves himself LOL. If work intervenes with “Plan A” then it’ll be taking a rail trip down to the Smoke, and a lonesome drive “Up North”.
Driving north will be covered by having very adequate breakdown and relay /travel insurance; but either way it’ll be another “minor” escapade for, Plonker Lloyd again.
We are hoping against hope, that this will be the very start of what we all hope is going to be a long, happy, busy, but predominantly an enjoyable family acquaintance, in this cars history. Also look forwards, “again”, to a good retirement project.
I have been busy making a list of items of all that I assess I may need to take with me for, what will be a very “challenging” day out.
I have been helped by a member, who has suggested a very comprehensive list-but it’ll be nice to see what other members suggest, by comparison. I have had my chum MartinLowe, give me the first and some say may be the important spare part item-a 948 fan belt (I didn’t even know there was a difference between that one and the 1098 one) LOL, As they say everyday is a school day,with these older cars.
We would like it to be a good start.
Watch this space.
Thanks everyone for looking.
Pictures will follow shortly.
This was the first picture I received of the car.It is shown on the small trading estate where it was kept very close to the River Medway-Chatham.
The car had a defective clutch/gearbox (problem turned out to be a real head scratcher)
So was unable to be driven up to North Yorkshire and had to be releyed on the back of a lorry on the collection date.
The car had a defective clutch/gearbox (problem turned out to be a real head scratcher)
So was unable to be driven up to North Yorkshire and had to be releyed on the back of a lorry on the collection date.